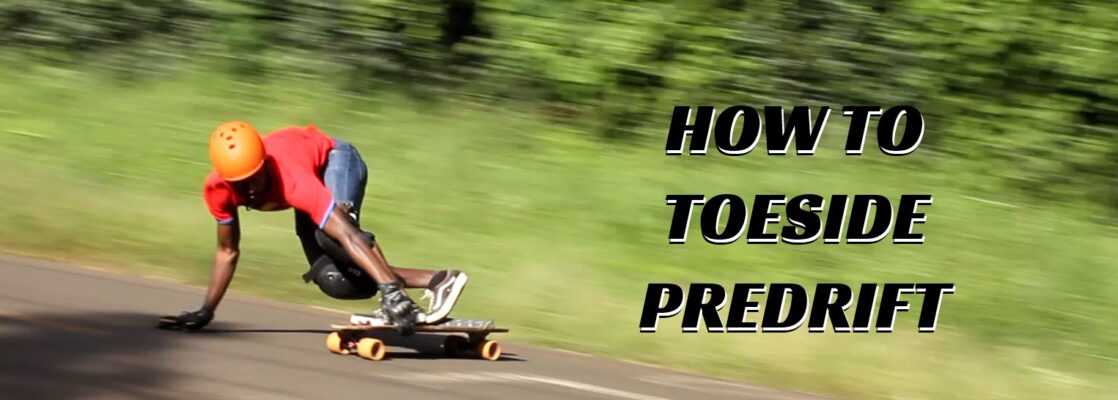
This guide is on how to toeside predrift. Also known as the backside predrift, this is a key skill for downhill skateboard racing and is extremely useful for open road riding.
This guide is part of the downhill skill progression guide. Check out the guide if you want to learn about which skills you need to learn for downhill skateboarding.
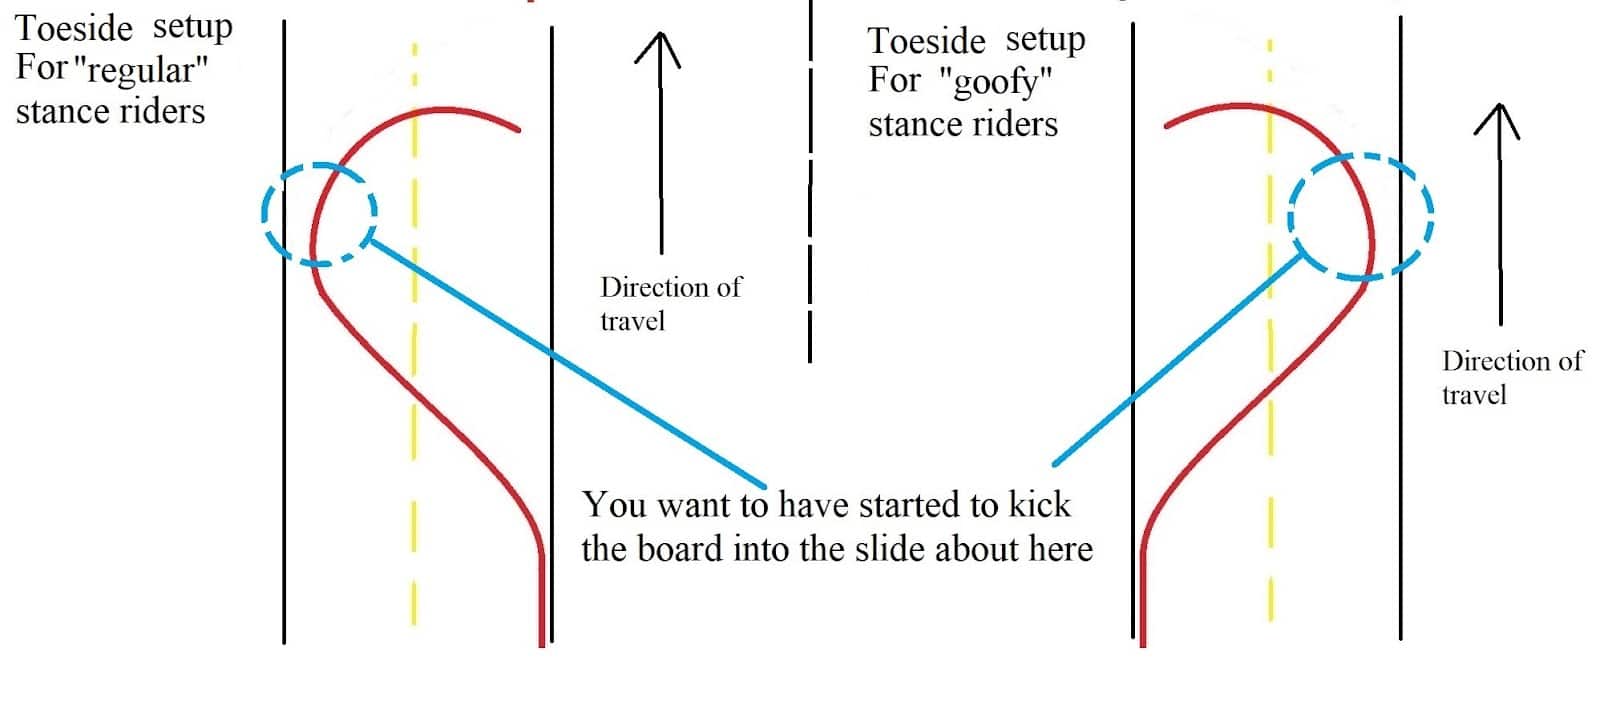
What is a toeside/backside predrift?
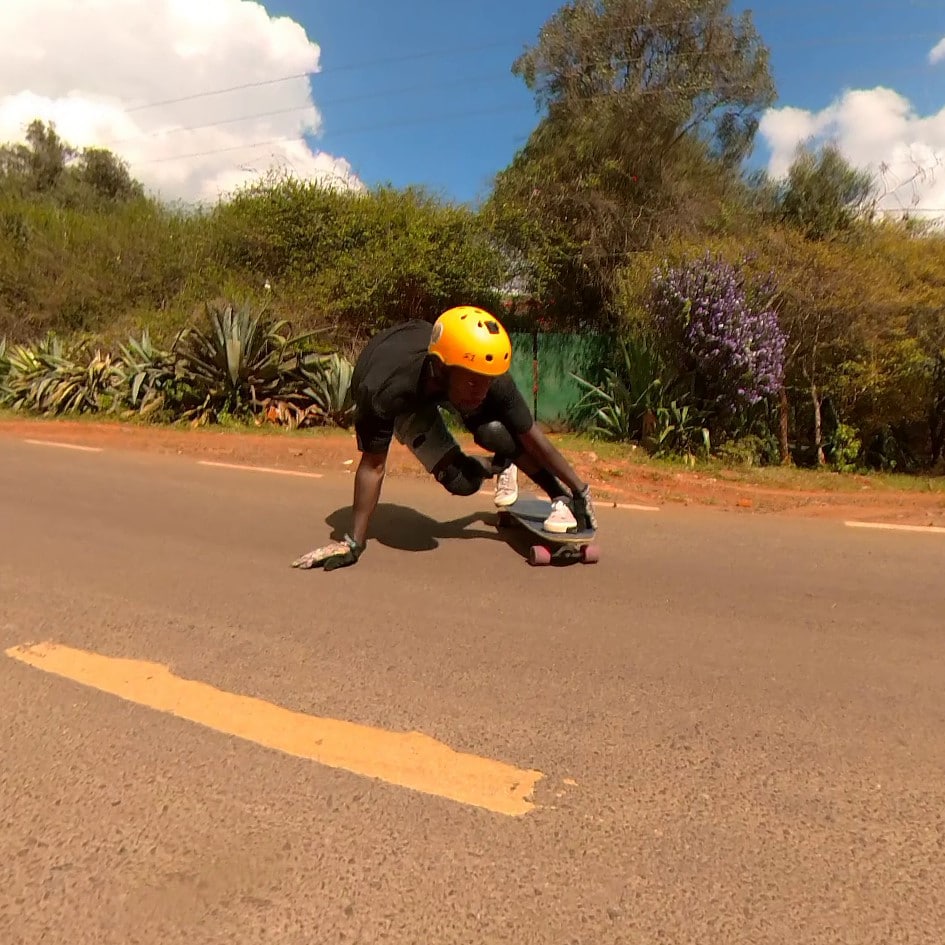
This is a hands-down longboard slide, where you slide toeside with your board at an angle less than 90*. The toeside predrift allows you to steer whilst reducing your speed through your slide. It is useful for slowing down before toeside corners.
It is mainly used during racing and open road riding as it is a great way to reduce your speed whilst also steering into a corner, allowing you to maintain maximum speed into and out of it.
Things you should try/know/find/do/understand before learning this
What to learn before this?
At this point, you should have already learned the toeside and heelside pendulum slides.
If not, you can check out my guides to learn how to do those.
Those slides provide you with the foundation of learning how to slide, and a way to stop in case of an emergency when learning the pre-drifts.
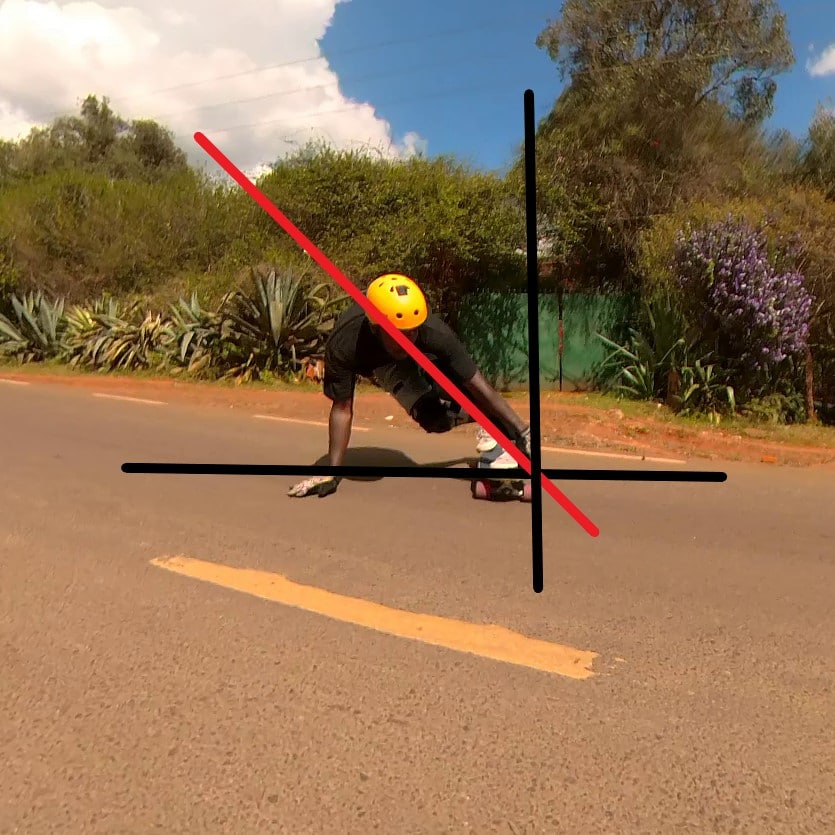
Get the body positioning correct
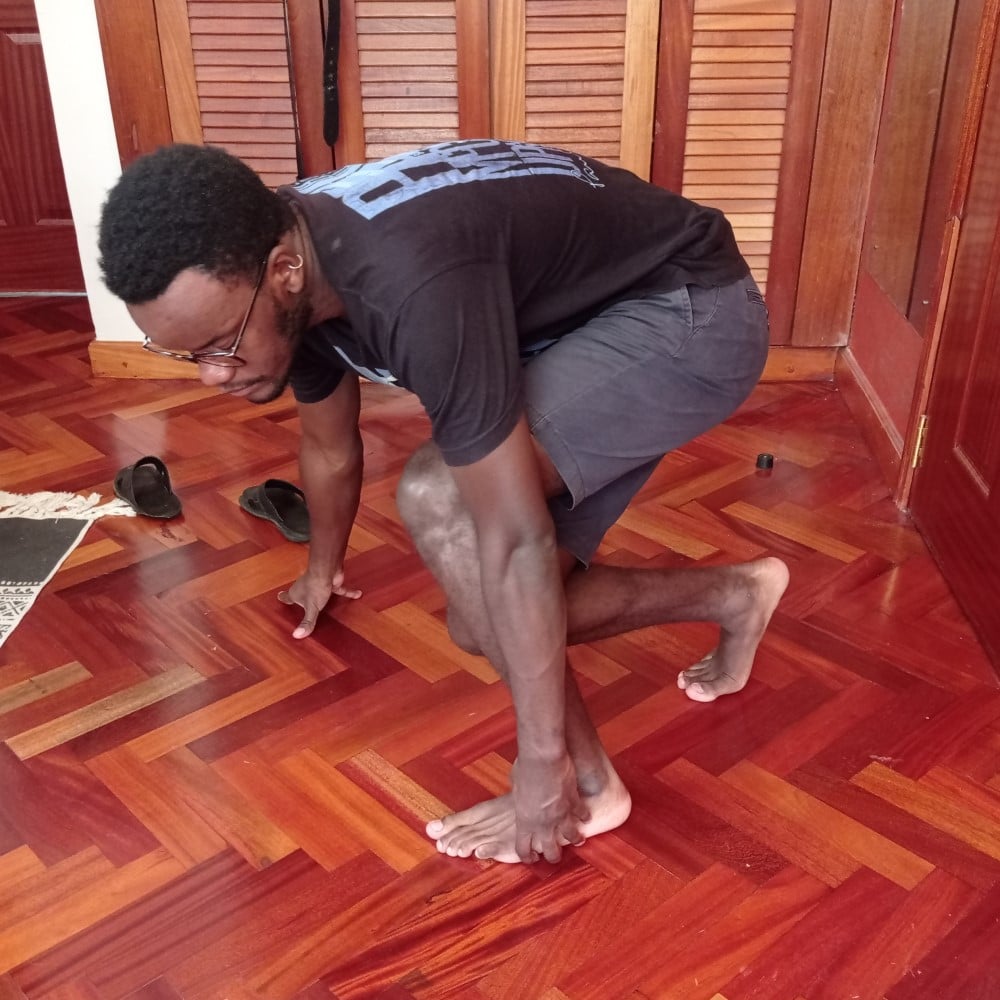
First, let’s sit on the ground (and then try it on the board) and figure out how best to position our body for this slide.
First, get into the toeside position.
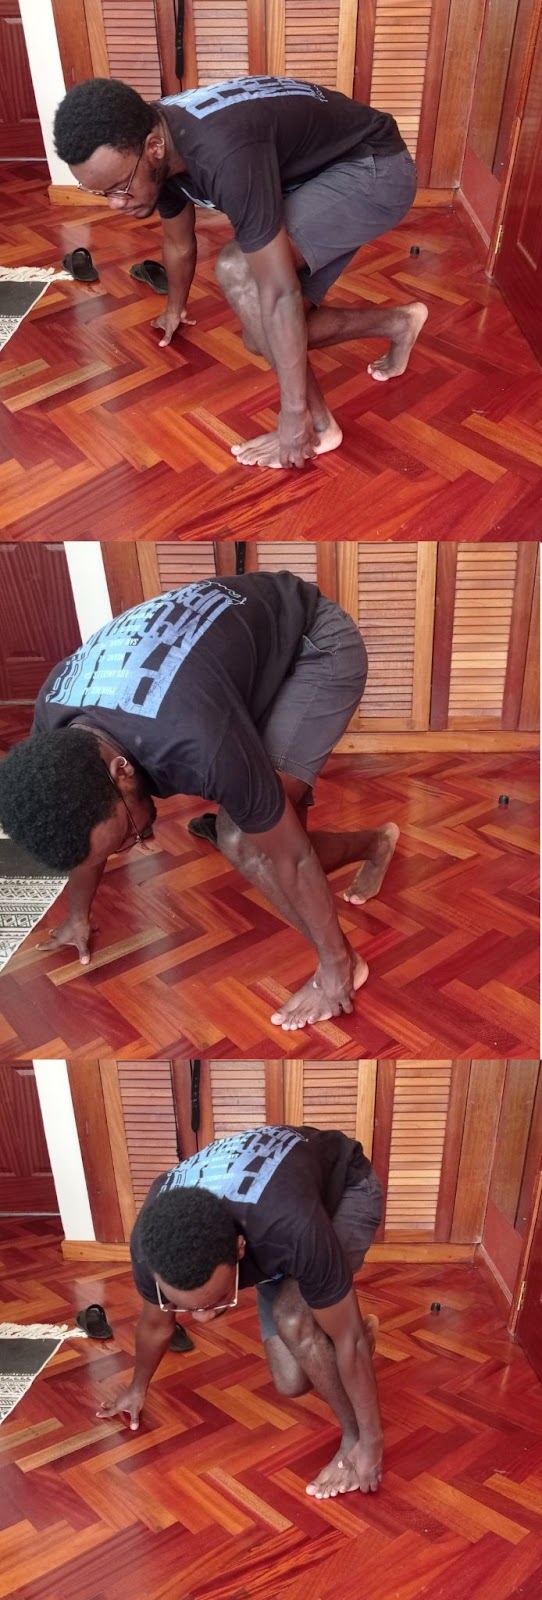
When you’re in the toeside position, take note of your:
- Hand position
- Where your head and shoulders are looking
- How you are placed/stanced over your front foot
- How much you are leaned away from your feet/lower body
Hand position
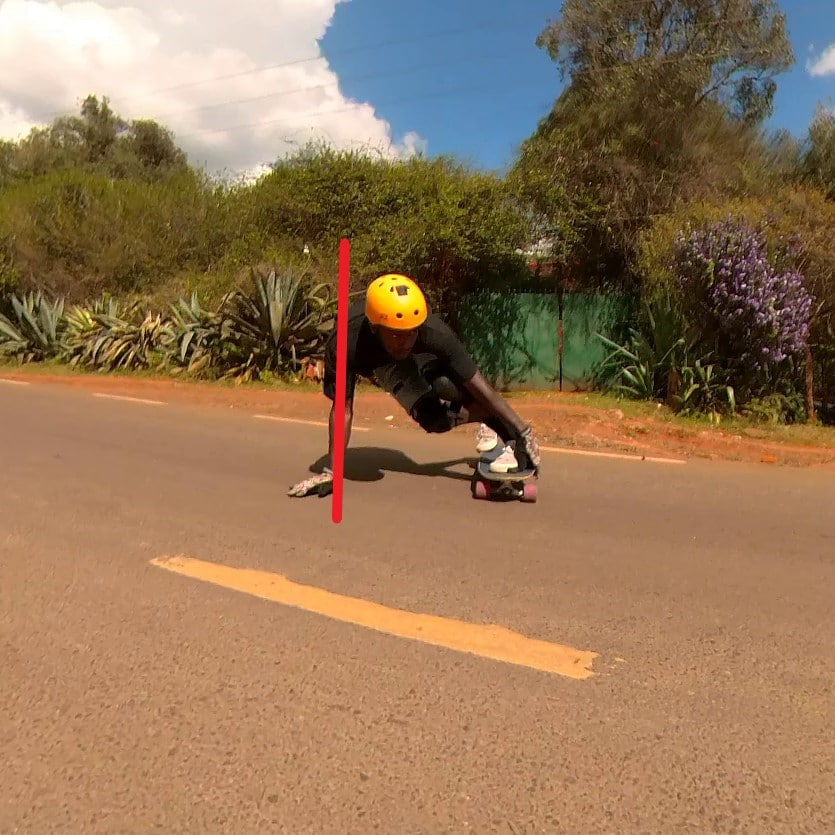
You want your hand position to be ahead (to the side of your board/front foot) …
If your hand is behind/inline with your trucks, you will naturally rotate into a toeside slide that will be over 90*. You want your hand to be ahead of and away from the trucks during this slide.
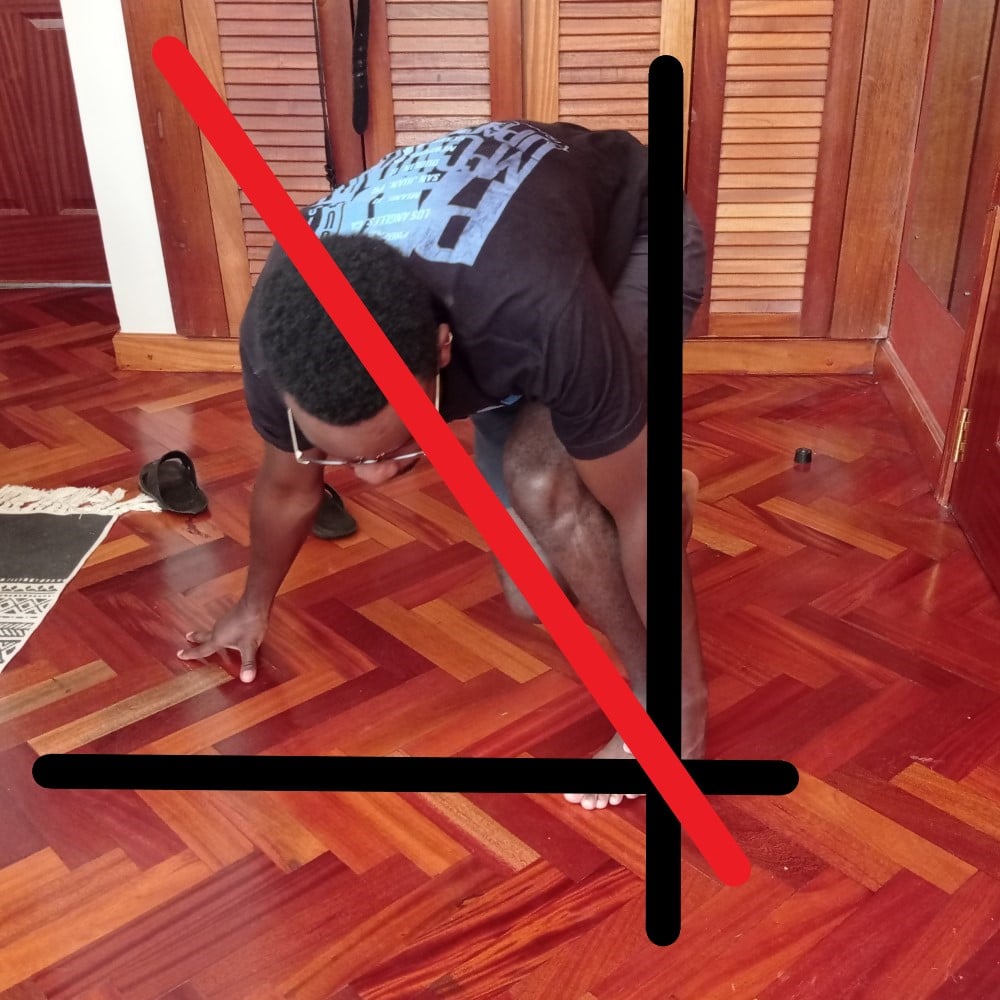
You also want your shoulders to be directly over your wrist.
This ensures you are not putting your hand too far away from the board and that your upper body will be sufficiently supported during the slide.
How you are placed/stanced over your front foot
A key to this slide is being properly stanced over your front foot.
Placing yourself properly over your front foot will allow you to drive the necessary weight and force into your front foot, as well as placing your body in a good position to control the slide.
It is key for the toeside pre drift and will be the difference between the slide feeling comfortable or difficult for you.
Let me say that again, IT IS KEY.
It also helps ensure your front hand will be placed as far ahead of (and way from) the board as we want it to be.
You really want to be driving your weight into your front foot, bending your front ankle … doing the next few things below will also help you do this position more accurately.
How much you are leaned away from your feet/lower body
The next thing you do is lean away from your lower body/feet.
This is going to allow you to drive weight into your feet/toes and help keep the slide going.
It will allow you to resist the “fight back” of your wheels sliding.
It is key and will help prevent you from highsiding.
Finally, it will also make placing your hand away from and ahead of the front wheels a lot easier.
The three points above are so key
The above three points I’ve explained are really going to make or break the toeside slide for you. Get them right.
Where your head and shoulders are looking/pointed
You want your shoulder, and chest pointing towards the apex. You don’t really want them to be moving much. Just have them pointed squarely towards the direction you are sliding in.
You will naturally move them a little when you initiate the slide and when you hook up from the slide. But you don’t want them to be a source of movement DURING the slide.
The board wants to follow your shoulders and hips in the slide. So if you move, the board will respond and will likely end up sliding at 90*, at over 90*, or it may make you highside.
Isolate the upper body
All the action in this slide comes from your legs. Your upper body stays pointing where you want to go. Specifically your shoulders, chest, and hips.
Moving your shoulders will cause your board to move in a way that is undesirable. It could even make you high side.
A good way to isolate your shoulders/head/chest is to simply look towards the apex/inside of the corner. You will also hear people say, look where you want to go. Both achieve the same thing, but the apex one is better in my opinion.
Foot positioning
If you have learned to toeside pendulum slide, the foot positioning should be the same.
If not, you can read this article for more info on this topic.
Weight distribution
I’d say the weight distribution might be something like 60-50% on your front leg and 30-40% on the back leg and whatever amount you’re comfortable putting on your hand, just don’t put TOO much weight on your hand.
I personally don’t actually weight my back leg during this slide. Instead of weighting it, I apply force and pressure on my back foot to get it to do what it needs to do. I don’t sit on it or apply weight. I push into the board with it.
Literally like 90% of my weight is on my front leg and maybe 10% on my hand. Now, I don’t know if it’s the way to go about weight distribution, but it works for me and others I have taught. So do try it. It will probably work but it may not be proper form.
The only time that I do weight my back foot is if I’m doing the toeside predrift without grabbing rail. I place about 10-25% of my weight on the back foot.
Stay planted on your front leg
It’s important to stay planted with your front leg, with your weight on it.
It will otherwise be hard to hold the low angle of this slide and also not high side.
This may vary for people, but I’ve found the easier you find it to be planted on your front leg, the easier it is to do this slide.
And not being able to be planted could be because of a few things: bad griptape, too grippy wheels, poorly setup board, too much concave on your board, bad foot position, bad setup carve, poor flexibility, so make sure all those things are not a problem.
Location, location, location
You then want to find a location that has a corner you can practice this on.
This slide will be easiest to learn on a corner. With a corner, it is much easier to point your body at it and it’s easier to hold the slide at a lower angle.
You also hook up with your trajectory pointing into the direction of the corner and don’t have to re-adjust so you don’t hit anything, you can simply keep going through the corner.
On a straight road, it’s difficult to point your body at an imaginary point, and even more difficult to hook up out of the slide and quickly adjust your trajectory so you don’t go off the road to the side.
Find a corner, preferably on a hill so you can get enough speed to learn this.
How to toeside predrift
Step 0: Practice hand drag carving
We’re going to warm up by practicing hand drag carving.
This will allow us to get comfortable in the slide position when on the board and when moving. This will give us a lot of confidence when it comes time to do the slide.
I recommend starting your session by warming up this. Doing 180* hand drag carves is also highly recommended.
Step 1: Setup carve
As always we start by initiating the setup carve.
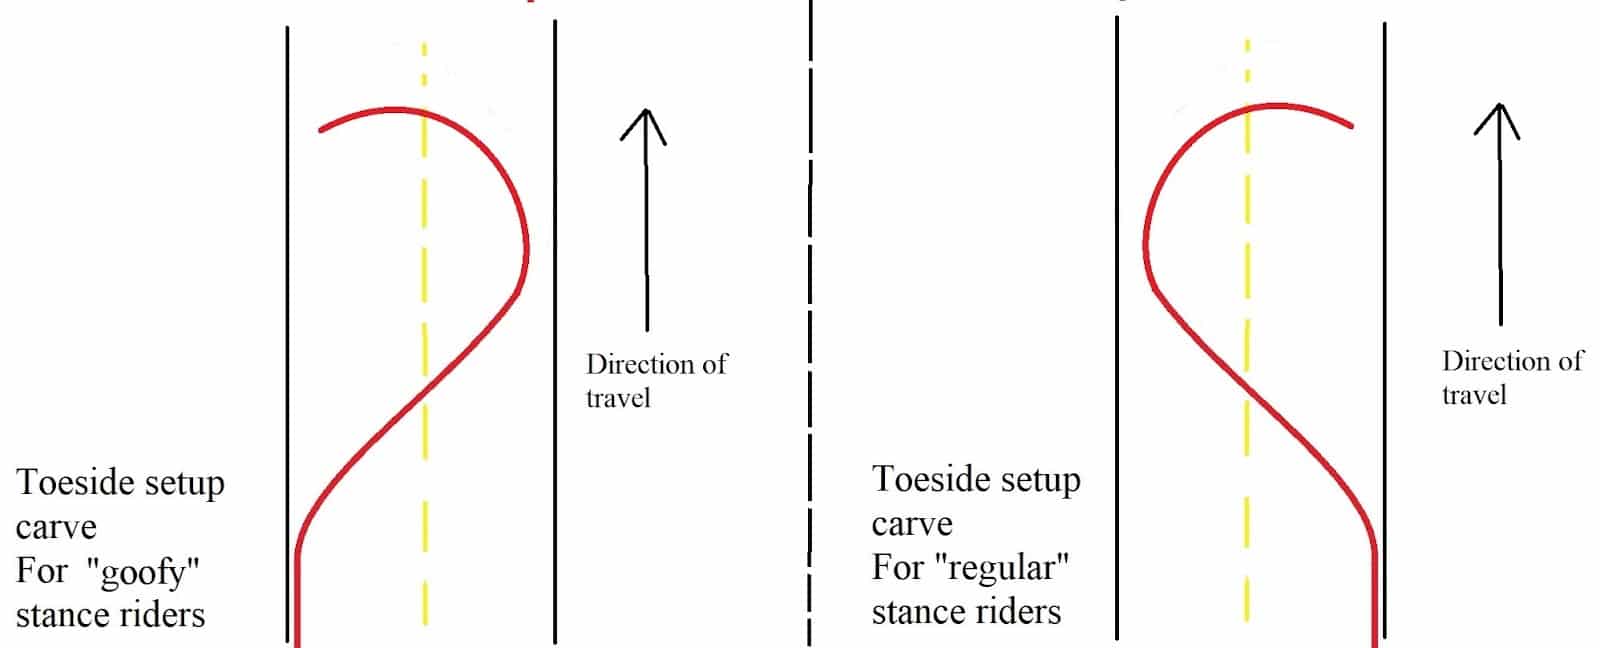
The setup carve is very important. It will help you bring your board to that edge of traction where it is easiest to kick it out into a slide.
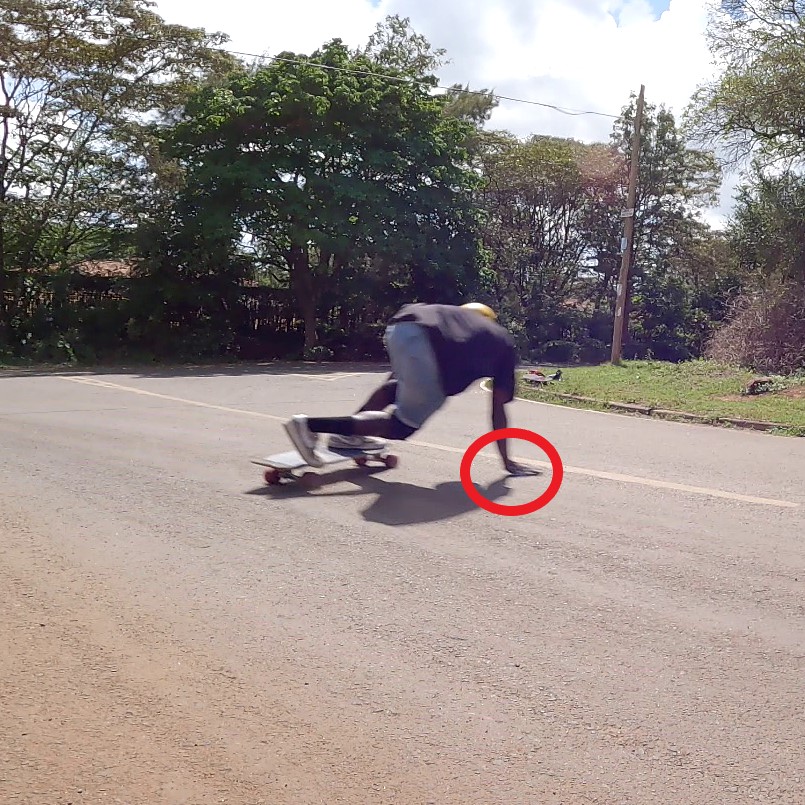
Step 2: Hand on the ground
Arguably the most important step. If you can nail this you will be able to pre drift comfortably.
At this point of the setup carve, you get into the toeside position, putting your hand on the ground, leaning off your board, and shifting your weight to the appropriate places.
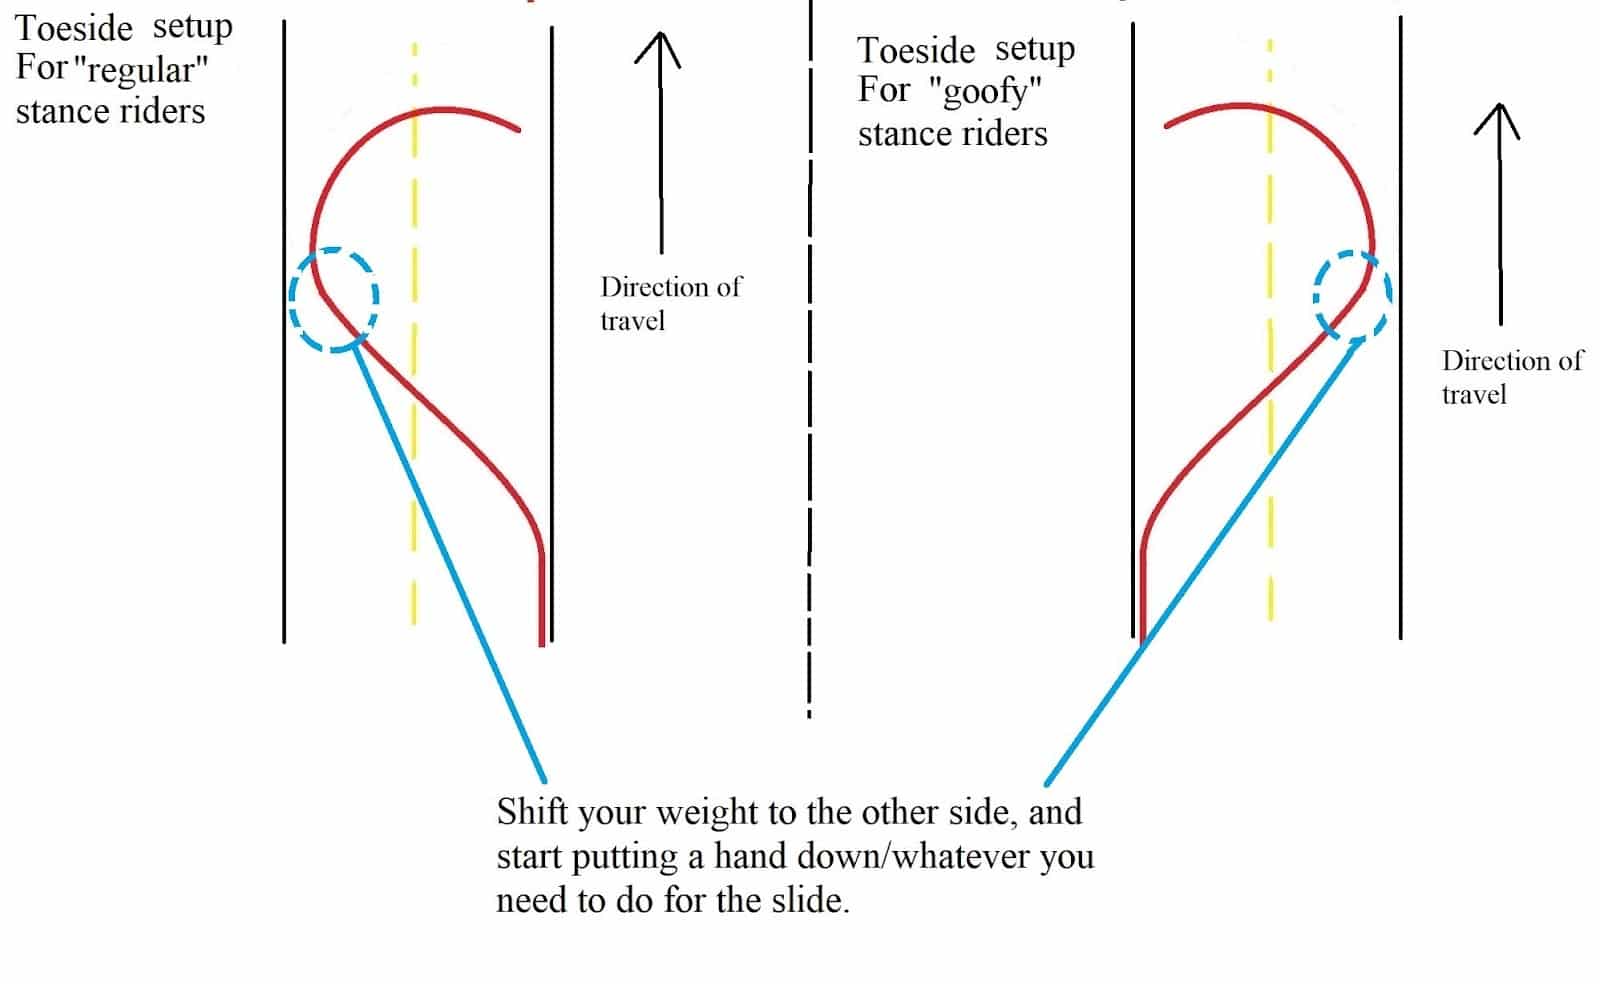
How composed and comfortable you are in this position will determine how easy it is to kick out the board and control it.
With the putting of your hand on the ground, you also lock in the position you want your upper body to face. You shouldn’t move your upper body much after this (but it can shift in reaction to your lower body).
This step is so important. In most cases, it can make or break the predrift.
You may also want to try leaning off a lot/more from the board. It may make the kickout easier.
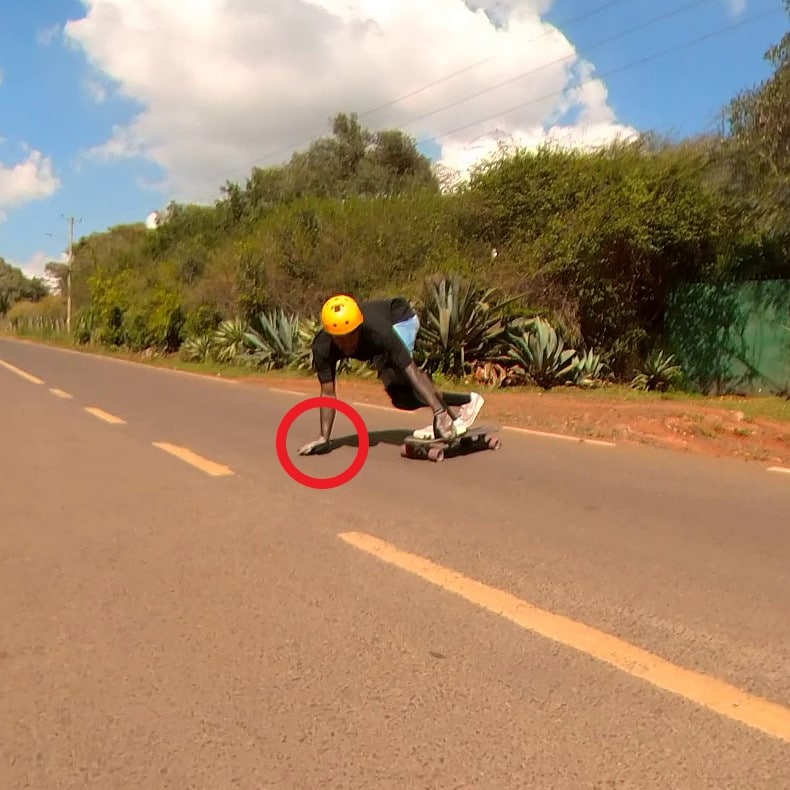
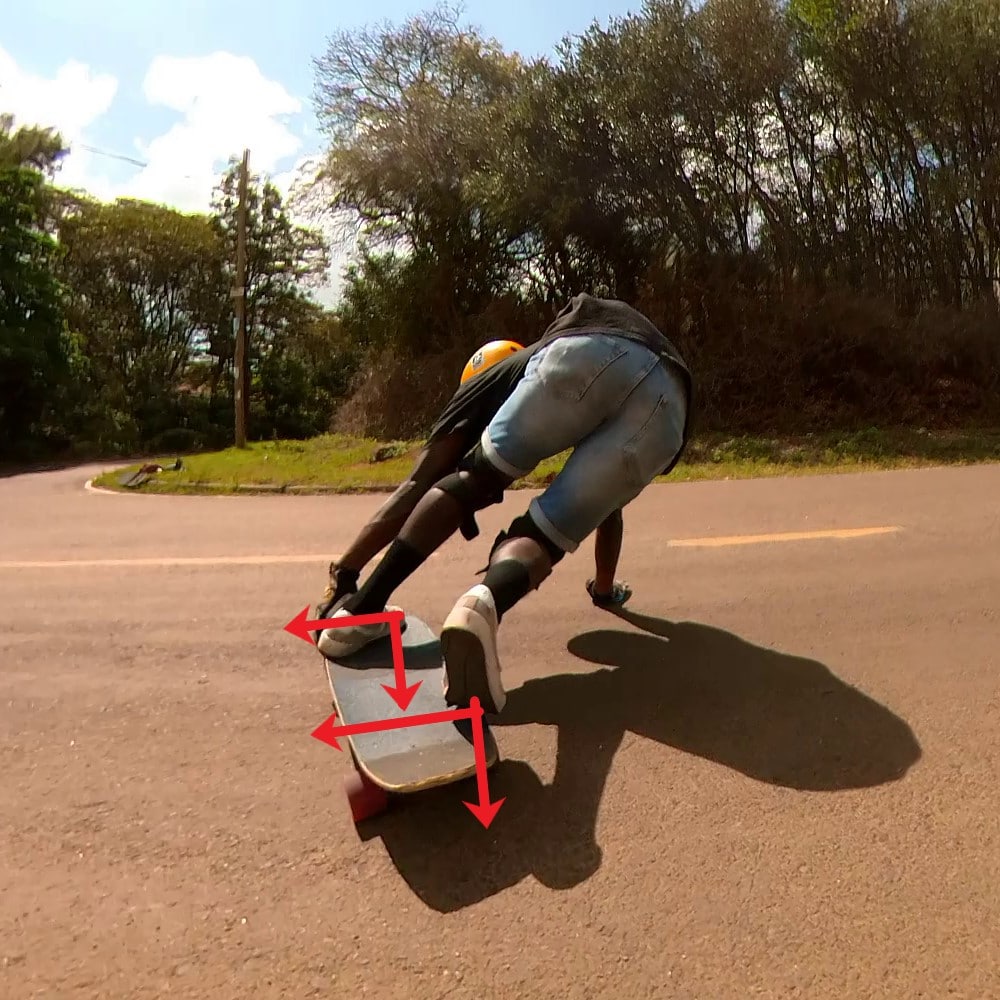
Step 3: Kickout
At this point of the setup carve, start kicking/pushing out your back leg.
The kick-out is pushing your back leg out, but you also push down.
It’s a forceful, but controlled push. You have a lot of pressure and power behind this leg, but you exert that power and force gently.
As you kick out your back leg, you should focus the pressure and weight on your front leg on your toes/the upper part of your foot.
Having weight/pressure on your front leg will help the front wheels break out and will be KEY to holding out and controlling the slide.
When maintaining pressure on your front foot, it’s almost like you are sitting on it and forcing it into the ground.

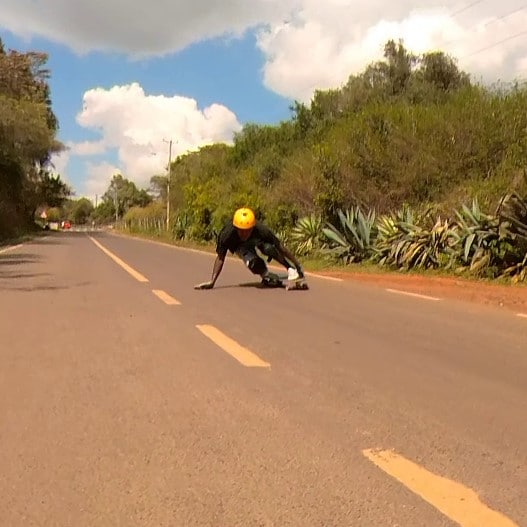
Step 4: Hang in there
If you’ve done the above correctly, hang in there as you drift towards the apex of the corner and shave the desired amount of speed.
To hold the slide, simply maintain the pressure on your back foot and the pressure on your front foot.
Also, keep leaning off the board – this will keep you in the right body positon to prevent highsides.
And once you’ve shaved off as much speed as you want, it’s time to hook the board back up.
Step: 5 Hookup
So yeah, as you pushed your back foot out, you simply decrease that pressure. But you do so in a deliberate and controlled way.
As you do this, you also maintain weight and pressure on your front foot (remember on your toes/upper part of your foot).
Both of these things should allow the board to start to rotate in the opposite direction and stop sliding.
Once you feel the board stop sliding, you can lift your hand off the ground.
Do this
As the board hookups, bend into your front knee (and bend your back knee too) to absorb the momentum of the hookup and to help keep your board composed.
This is a very good thing to do. It will help you have very consistent hookups and allow you to feel confident about them.
You don’t have to bend a lot, it can be a slight bend.
Some tips
Use a footstop
A footstop will help you push against the board and will keep your feet stuck on to it.
Not everybody has the flexibility to dig in to the board so a footstop helps a lot.
More tips
- Make sure you’re going fast enough.
- Imagine your front foot as a pivot and your back leg as the rudder that controls the angle of the board according to that pivot. In line with this thinking, your front foot should be planted, pushing against the board.
- If you’re scared of high-siding, remember to setup carve properly and put pressure on your toes. By keeping pressure on the toeside side of your board, you decrease the likely-hood of high-siding.
- A good way to put pressure on your front leg is by simply straightening it and pushing it into your board.
- The angle you want your board to be at when you slide, will determine how strongly you kick out.
- I like to load the board by getting it into a turn (after the setup carve) before kicking it out. When you watch my toeside clips, it looks like a slight hesitation before the slide. I also like to bend my knees going into the slide and then straightening them out once I get the slide going. This makes the transition between gripping and slipping easier and I feel I can control the board better.
- For the pushing of the back foot, for me it feels like I pushing backward, to the side and down at the same time. Pushing down allows for better control as the wheels slide smoother. Pushing backward just happens sorta naturally.
This guide is part of the downhill skill progression guide. Check out the guide if you want to learn about which skills you need to learn for downhill skateboarding.
And that’s it! Has this guide been helpful?
And that’s it for the tutorial, let me know if it has been helpful and if you have any questions. Thanks for reading.
Big thanks to all my patrons for the support – David, Squirrels Adventures, Mike, Jed, Mowgii, Jan, Josh, Jay, Jay, Bryan, @owencampbell777, @dkwan, Alex, Kasajja, Domnik, Reuben, @pablo.vega.andrade, Vlad, Asa, Helge, DeLacoste, Peder, Josh, Mike, Anthony, @issishreds, Greg, Jackson, Slipa, Louisa, Bill, Steve, John, Austin, @bomber_p_, Brian, Jeffrey, Jules, Henry, Austin, Philip, and Justin. I couldn’t write articles like this without you guys’ support.