This guide is on how to set up carve for longboarding. Set up carving is a necessary move for longboarding sliding – not doing it right can make your sliding attempts result in nothing, or worse, in injury. Check it out below to learn more.
This guide is part of the downhill skill progression guide. Check out the guide if you want to learn about which skills you need to learn for downhill skateboarding.
What is a setup carve?
This is an exaggerated carve that downhill skaters do before sliding. It’s an initial carve to opposite direction you want to slide in. It allows you to swing out your board, making it easier to get it to break traction and slide. Mastering it will make sliding a lot easier for you.
Check out the examples below to see what a setup carve is.
Toeside setup carve examples
Heelside setup carve examples
Why is set up carving important?
A setup carve is important because:
- Makes it easier to make the board drift out.
- Puts your body, and weight in such a position where you will be able to have optimal control of the board during the slide – the swing just before you slide allows you to load up the board with your weight (and lean off the board with your body) so you get enough leverage to control and push against the board … a lot of words but just know it’s a good thing.
- Allows for a smoother break into traction – the setup carve kinda helps bring your wheels to that edge of traction where it is alot easier to get them to drift.
What happens if you don’t do it?
If you don’t setup carve properly or do it at all, you will:
- You’ll have trouble trying to slide your board.
- The wheels won’t break traction easily (leads to a jittery slide) or at all.
- Your weight will be in the wrong place on board – making it hard for you to weight the board correctly (eg. putting weight on your toes or heels), get a good amount of leverage and thusly control the slide.
- Your body positioning could be off, making it hard to stay on board or control the board at all.
- You won’t be able to control the slide easily – this could result in a highside or lowside.
Do some riders not set up carve?
Of course, as you improve as a rider, you may not always have to set up carve. This also depends on your riding style, gear, experience, flexibility, the road, etc.
Some gear favors not having a setup carve at all … check out Harry Clarke thrashing the Rogue slaloms below. These trucks work and feel best when you don’t setup carve them into a slide. But this is a niche case.
Again, check out Nick Broms below. He rides Ronin trucks. These trucks work best without a setup carve, instead you kinda “load the trucks/wheels” which results in the best slide. Again this is a niche case.
Anyway as a beginner this isn’t something to worry about yet. You should always set up carve. But the point I want to make is, some experienced riders may not set up carve for a slide. But their technique, skill, experience, and gear may allow them to not have to do so. Don’t always look to them as an example to follow.
How to setup carve for longboard sliding
Step 1
You do a deep carve to the opposite direction of how you want to slide.
Eg. If you want to slide heelside, you do a deep toeside carve.
If you want to slide toeside, you do a deep heelside carve.
Check out the image below for an illustration.
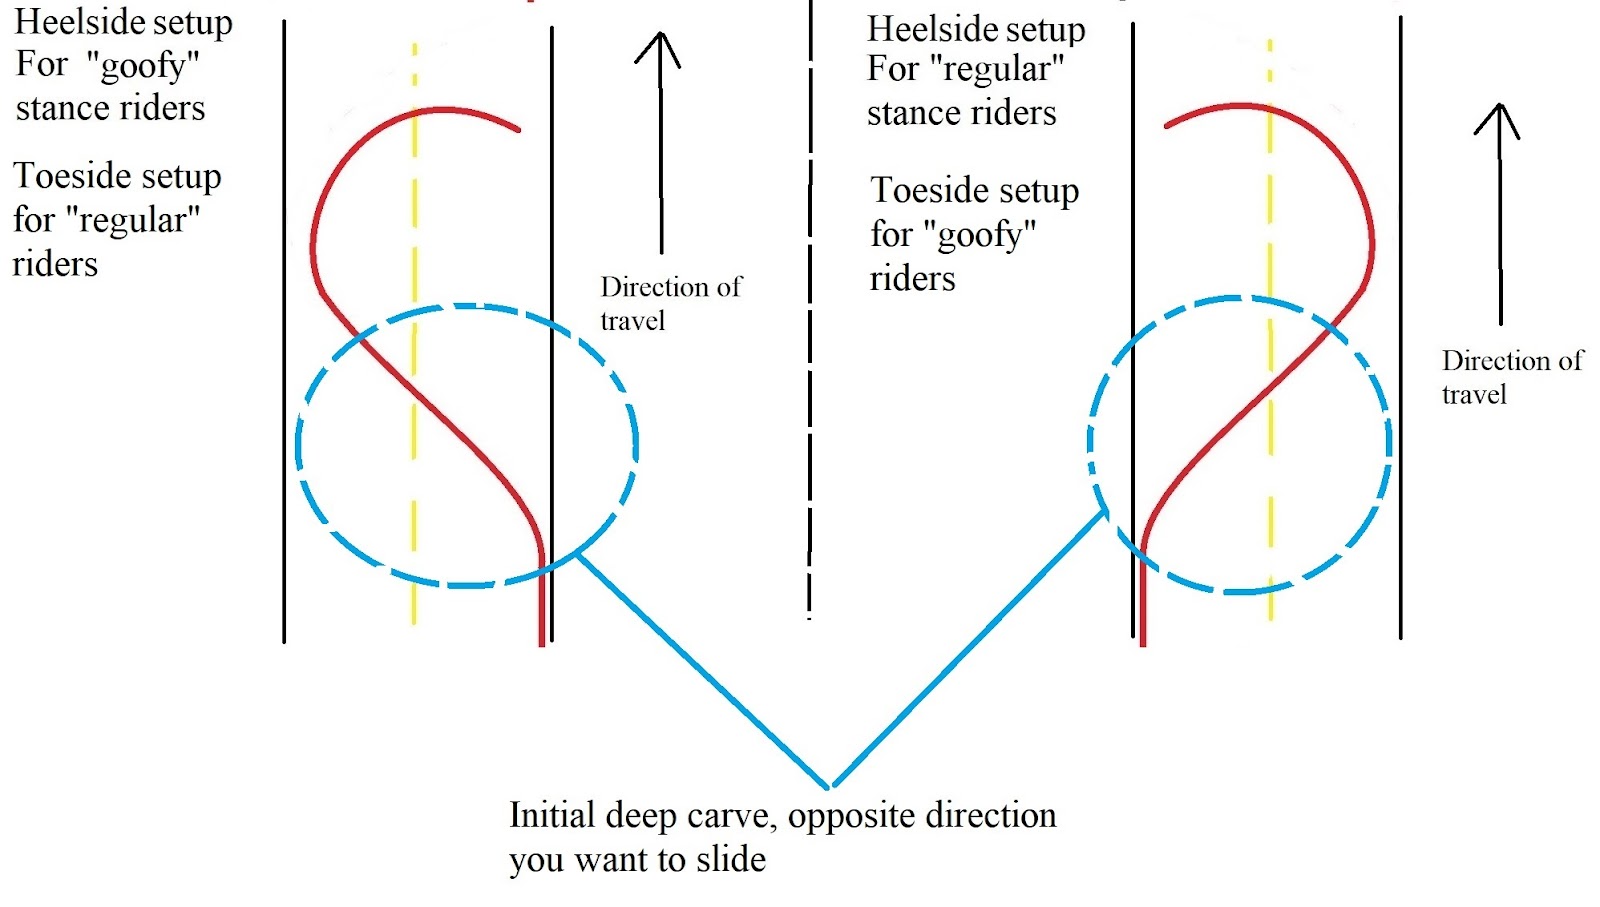
You can also carve deeper to the opposite side, either more aggressive or so that the carve has more of a curve than the straight line show above.
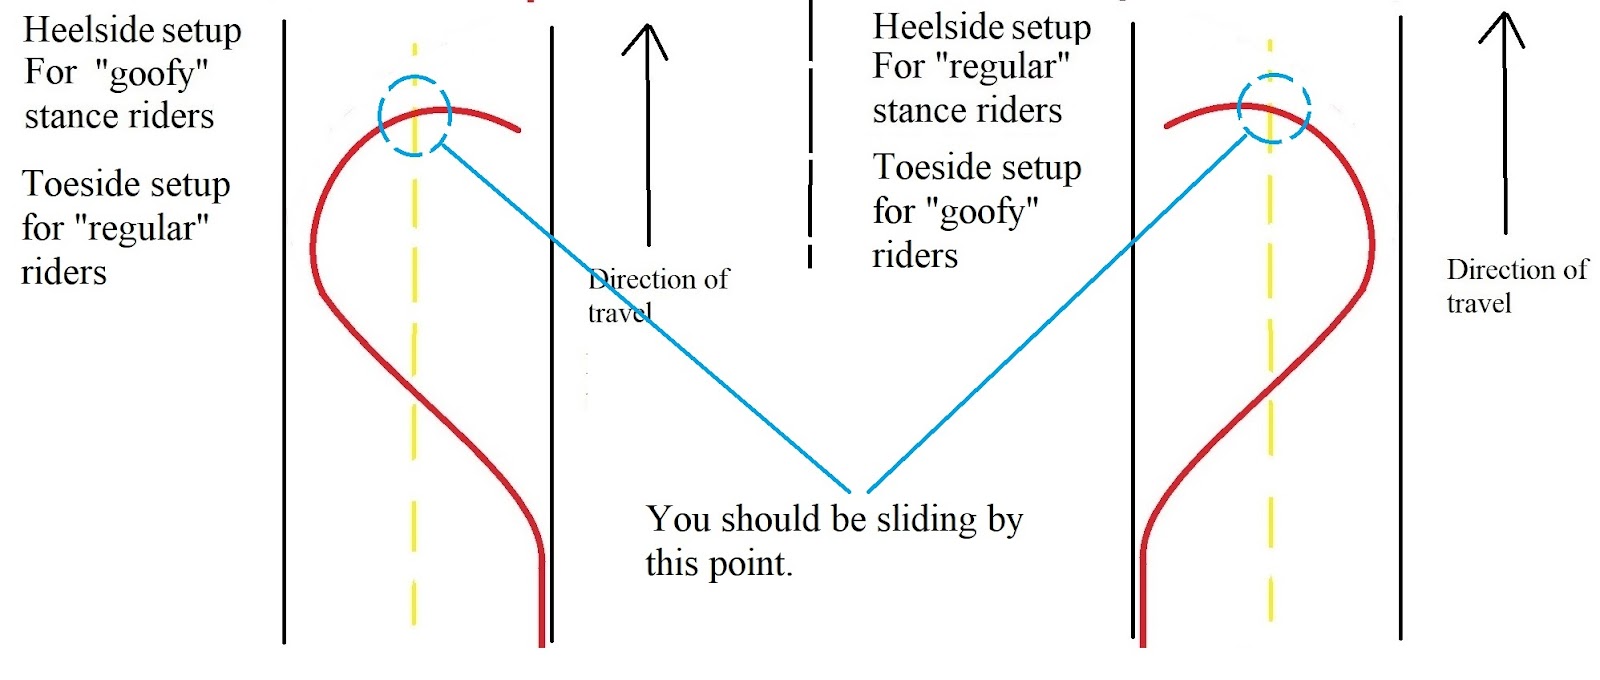
Step 2
You then shift your weight and swing towards the direction you want to slide, simultaneously setting up for the slide.

With both of these motions, you should have carved a sort of “half-S” shape on the ground. And you should be sliding by the point you get to the top of the S shape. More on this below.
Step 3
You want to start the motions of placing your hand on the ground/shifting your weight before you get to the top of the S shape (as I wrote above in Step 2).
You want to kickout the board when you get to the point illustrated in the image below. This is so you’re fully in the slide when you reach the zenith of the s shape.

Step 4
You should be sliding by the time you get to the zenith/the top of the s curve.
I won’t go into details about sliding – I will have several in-depth guides to cover all that (you can check them out as they’re all linked here).
But the setup carve will be key for all of these. And honestly, will fix so many issues people have with sliding, controlling the board, and staying on top of it.
Conclusion, was this post useful?
Setup carving is very important. I’ll be referencing it a lot so I thought it would be easier to give it its own article that I link back to when needed. If this article has been helpful, let me know!
Big thanks to all my patrons for the support – David, Squirrels Adventures, Mike, Jed, Mowgii, Jan, Josh, Jay, Bryan, Owen, Daniel, Alex, Kasajja, Leah, Helge, DeLacoste, Connor, Josh, Mike, Anthony, Ismail, and Justin. I couldn’t write articles like this without you guys’ support