
The time has come! I’ll finally be talking about how to longboard slide and what steps you can take to learn to do it. I’ll go over the different types of slides, what works, what doesn’t, the equipment you’ll need etc. Everything you need to know how to slide on your longboard will be covered here, and more! Check it out.
This guide took me a while to write and put together (it’s over 8000words!) If you want to support me and my work (and help with purchasing gear), you can sign up to be a patron here.
What is a slide?
Before we get into how to actually slide, you need to learn about the different slides – but before that, we actually need to learn what a slide is. I think this sort of information is important as it provides you with a foundation. It will be useful when talking to other skaters, reading other DH skate blogs, asking for advice etc.
A slide is basically making your wheels break traction. The friction from them sliding on the ground allows you to slow down in a smooth and controlled way. A nerdier explanation would be using your weight, body position, and carving the board to a point it oversteers and starts to break traction.
You then use your superior balance and control to keep the board in the oversteer position until you’re satisfied with how much you’ve slowed down. You bring it back, allow it to regain traction, and roll away.
The different types of longboard slides
The pendulum (pendy) slides
A pendulum slide is a hands down slide where you’ll swing side to side during the slide. It is a great way to slow down when you’re going fast and is often the first slide a beginner will learn. It involves the use of the shoulders to help steer the direction the board will be sliding in.
By swinging your shoulders left to right, or right to left. You can make the board swing into one direction, then help it swing back into the other by throwing your shoulders in the desired direction. Swinging your shoulders back also helps you regain traction so you can roll away and keep going down the hill.
The pre-drifts
A predrift is a type of hands down slide you do before a corner. It allows you to shed enough speed so that you can take the corner safely without understeering into the other lane or off the road. It’s a staple slide in racing, and useful to help you skate open roads safely.
To predrift, you slide the board as normal but keep the slide (and your board) under an angle of 90°. This angle is in reference to the road. Imagine the road is a straight line, and the angle of your slide intersects it. Sliding at less than 90 allows your wheels to rotate during the slide, ensuring even wear and excellent braking ability.
If you slide at 90 the wheels don’t rotate. Instead, only one side of the wheel will do most of the sliding. This will wear down this section of the wheel alone and will leave the rest of the wheel untouched. If you continue to slide at 90°, it could lead to your wheels turning into an oval shape or in the most severe cases, flat-spotting – where the worn side becomes totally flat.
Sliding at less than 90° also allows you to turn and steer your board during the slide. This is useful, as it can help you take amazing race lines on the road, or slide in a way that you allows you to take the corner better.
Finally, if you slide with your hands behind your heels, it is called a heelside or a frontside slide. If you slide with your hands in behind your toes, or your back facing down the hill, it is called a toeside or a backside slide. Watch the video below for some examples.
Stand up slides
Stand up slides are basically the same as the pre drift slides above. However, this time you do not put a hand on the ground. You cause the wheels to break traction through hard carving and pushing out your board. You then balance on your board as it glides across the pavement. To regain traction, you shift your weight and allow the board to grip up, so you’re able to roll away.
Stand up slides are the most spectacular type of sliding, but are also the hardest and riskiest to do. That said, if you set up your board correctly and keep some basics in mind, they aren’t too difficult to do, even at higher speeds.
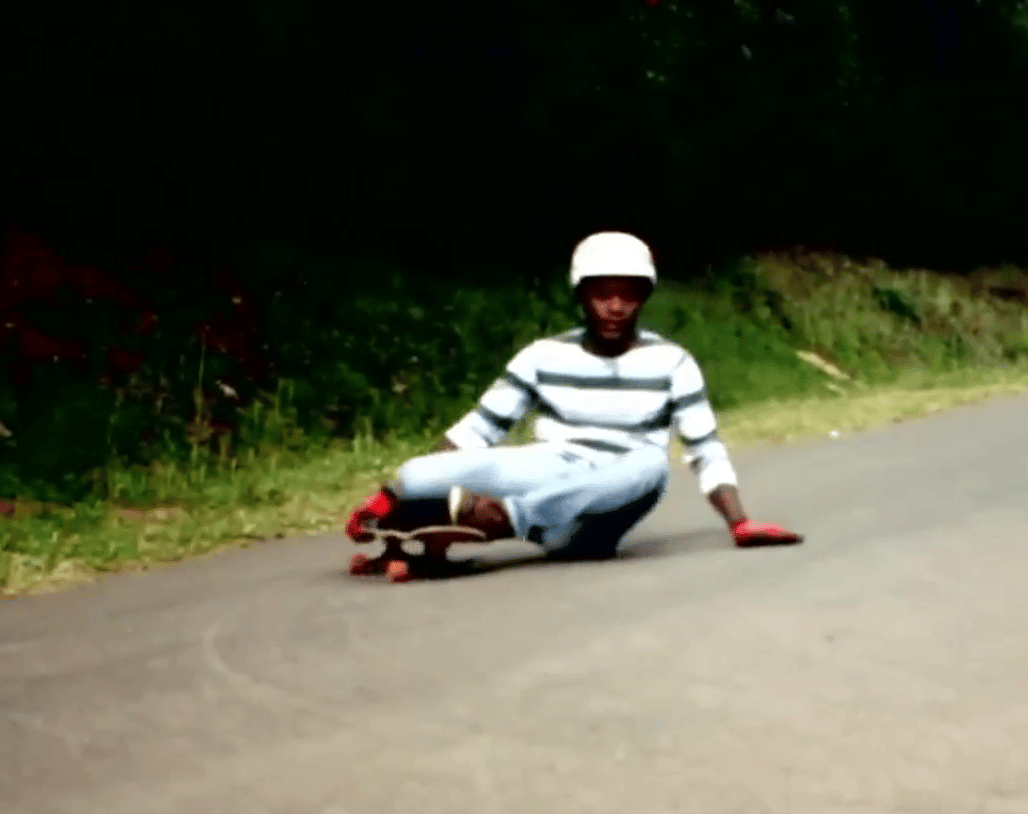
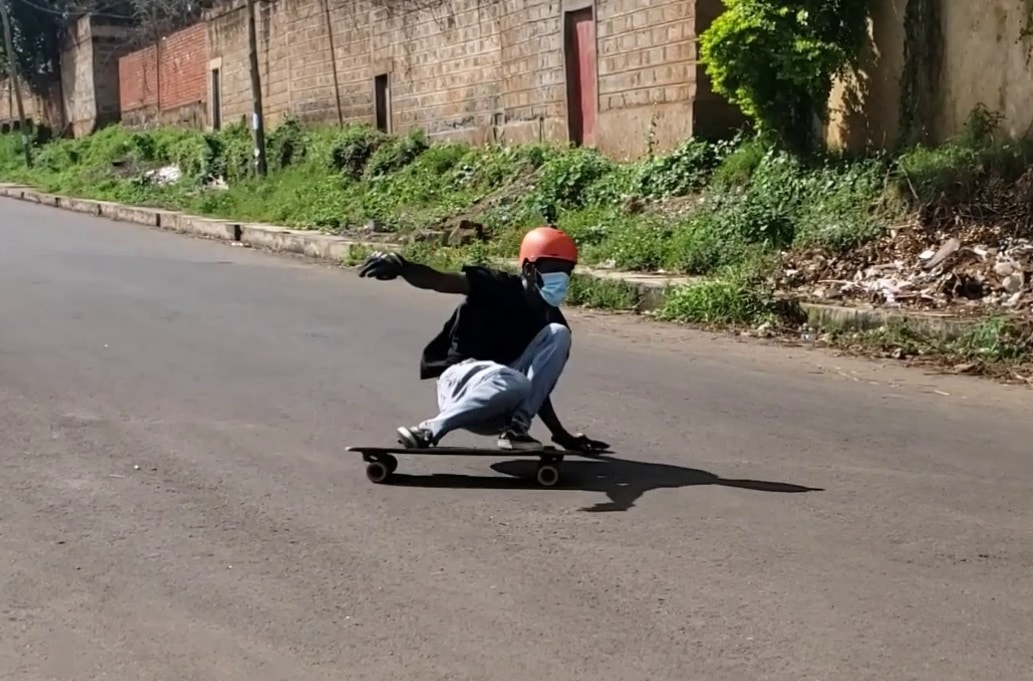
Sit down/squat slides
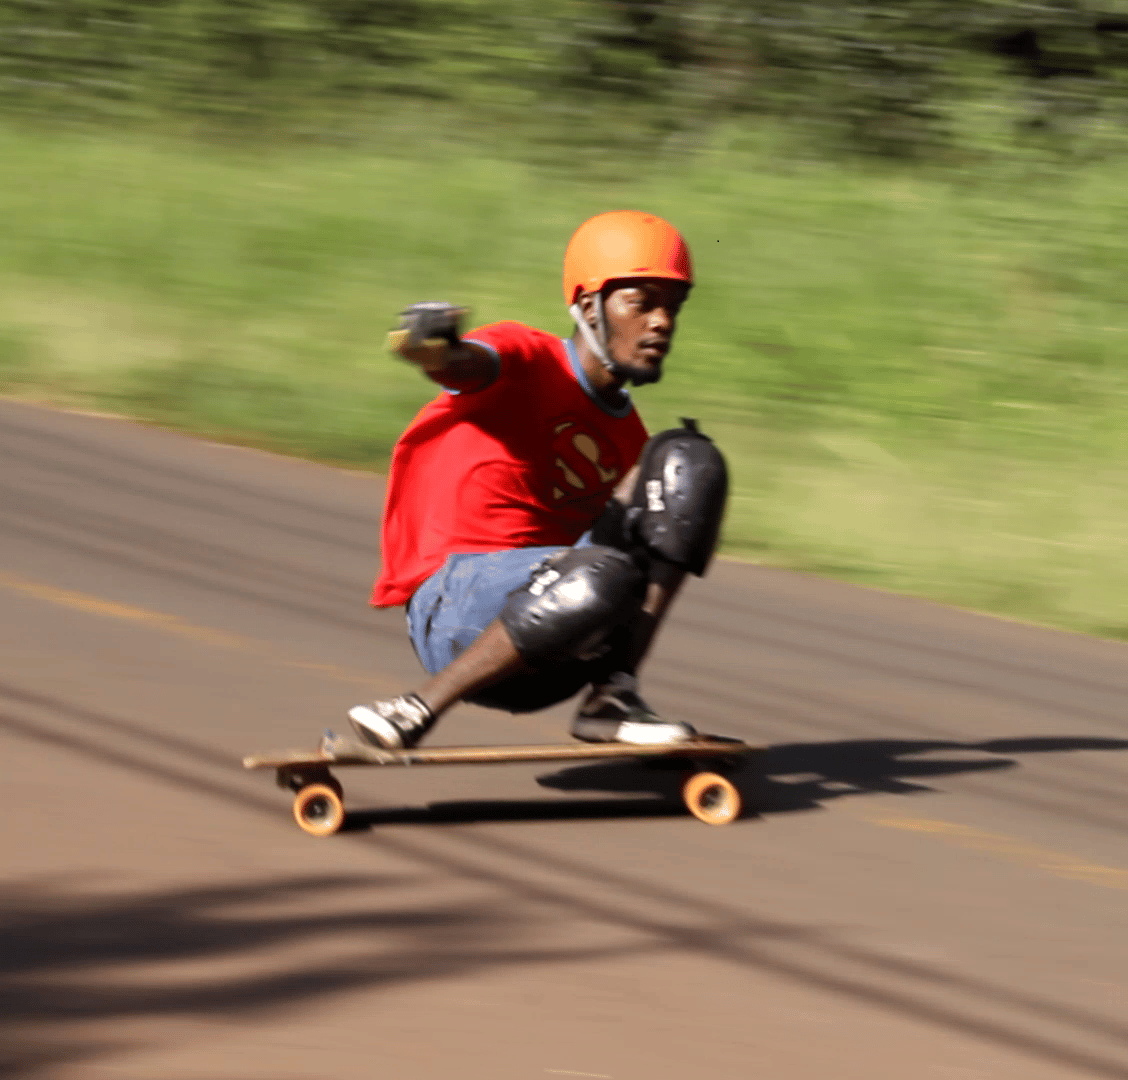
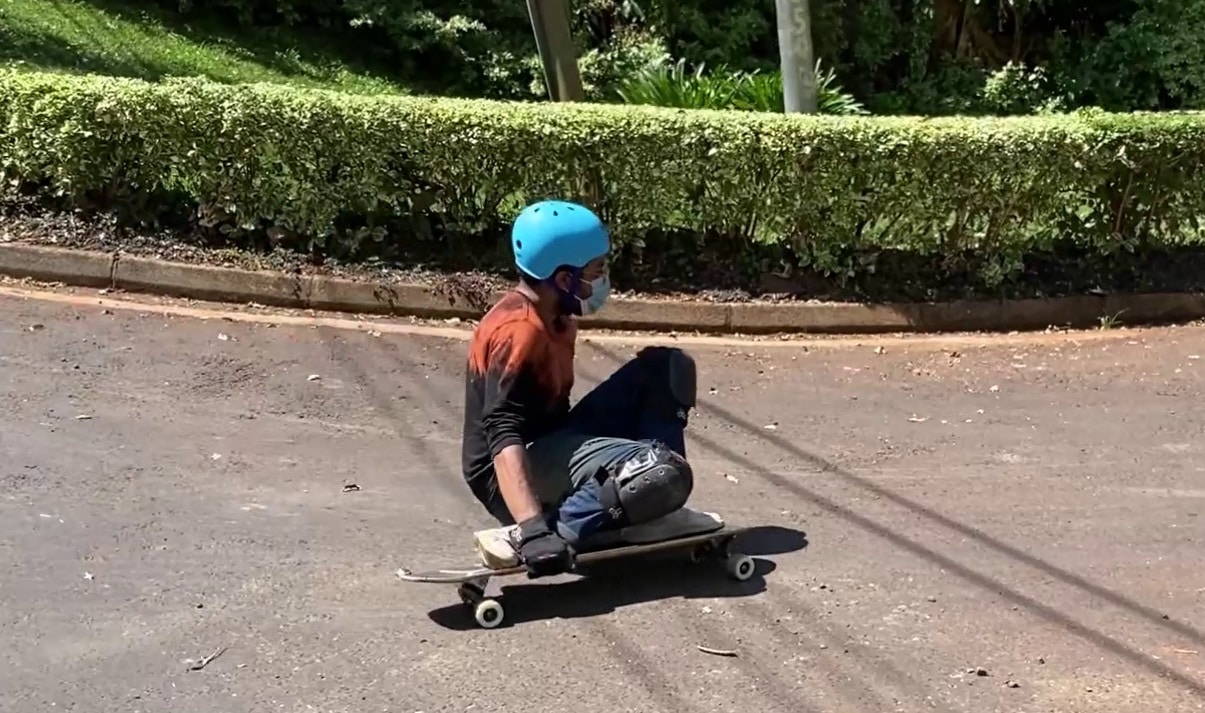
Sit down slides are a variation of stand up slides, But this time, you squat on your longboard as you slide, or just try to get as low as you possibly can. They are very similar to stand up slides in how they are executed. They are very easy to do if you have a solid squat and can squat well on your board.
For another example, look at this picture of Nick Broms doing a squat slide. Nick has a lot of style and is able to pull these off seemingly effortlessly. He is one of the riders to pay attention too over the next few years. If you want to see some crazy downhill skateboarding, it is worth giving him a follow on Instagram.
Things to do before trying to longboard slide …
Do you have the right gear/equipment for sliding?
Yes. If you want to slide, the absolute basic equipment you’ll need are:
- Slide gloves – click here to check out my guide to slide gloves.
- Slide wheels
- Helmet – click here to check out my guide to helmets.
- Pants you don’t mind tearing up
- Hip pads to protect your bum
Whilst you can slide on any board, of any size with any wheels, a specialized setup will always be better and will make learning easier. At the least, I recommend you pick up Powell Peralta snakes as slide wheels.
If you want to find out how to make a sliding setup, click here to learn more.
You also don’t need a helmet to ride and slide. However, this type of riding is dangerous and puts you at risk of getting hurt. It only takes one bad high side (where you get thrown off your board forward), low side (where you fall backward), or wobble to put you at risk of getting hurt. Whilst you can recover from a scraped knee or elbow, brain damage is often irreversible.
Buy some protective gear
Protective gear is a cheat code to confidence and the ability to send it (skate hard) without worry. If you are always pussyfooting, you’re not gonna be able to learn quickly. Protective gear allows you to fail, mess up, and fall safely. You’ll be able to get back up from falls and keep skating like it’s nothing. At the minimum, you should have knee pads. Hip pads are also a good idea because you’re gonna fall on your bum A LOT.
Want to learn more about essential and non-essential downhill skate protective gear? Click here.
Get comfortable carving hard, side to side
Carving hard is essential to being able to slide. When you carve hard, you make it easier for the wheels to break traction. You take them to that point where oversteering/sliding is a slight nudge away. If you can’t carve hard, you’re going to find sliding to be very difficult.
The second half of the video below has a good guide on how to carve. Check it out.
Hand drag carving …
If you’re used to carving hard, it’s now time to learn them with your hands down. Hand drag carving helps you familiarise yourself with how your body should be positioned when trying to slide, and gets you comfortable getting that low and placing a hand down. Check out the video below for an example.
**You should have slide gloves before attempting this
If you can consistently do hand drag carves and can do a 180* turn with your hand down, then you are pretty much ready to slide. This exercise should just help you build the confidence and skills you need.
Hand drag carving also highlights any glaring weaknesses you might have. Whether that’s being able to put a hand down for a heelside carve, or if you’re simply too scared to carve toeside confidently.
It is also a good idea to do hand drag carving before every skate session. It helps you warm up and allows you to get comfortable putting your hands down. You get comfortable on your setup once again, and you’re able to learn if anything feels off about your setup – so you can make adjustments. It’s so underrated how useful this is. Even I as an experienced skater still do this to warm up each time I go out to skate.
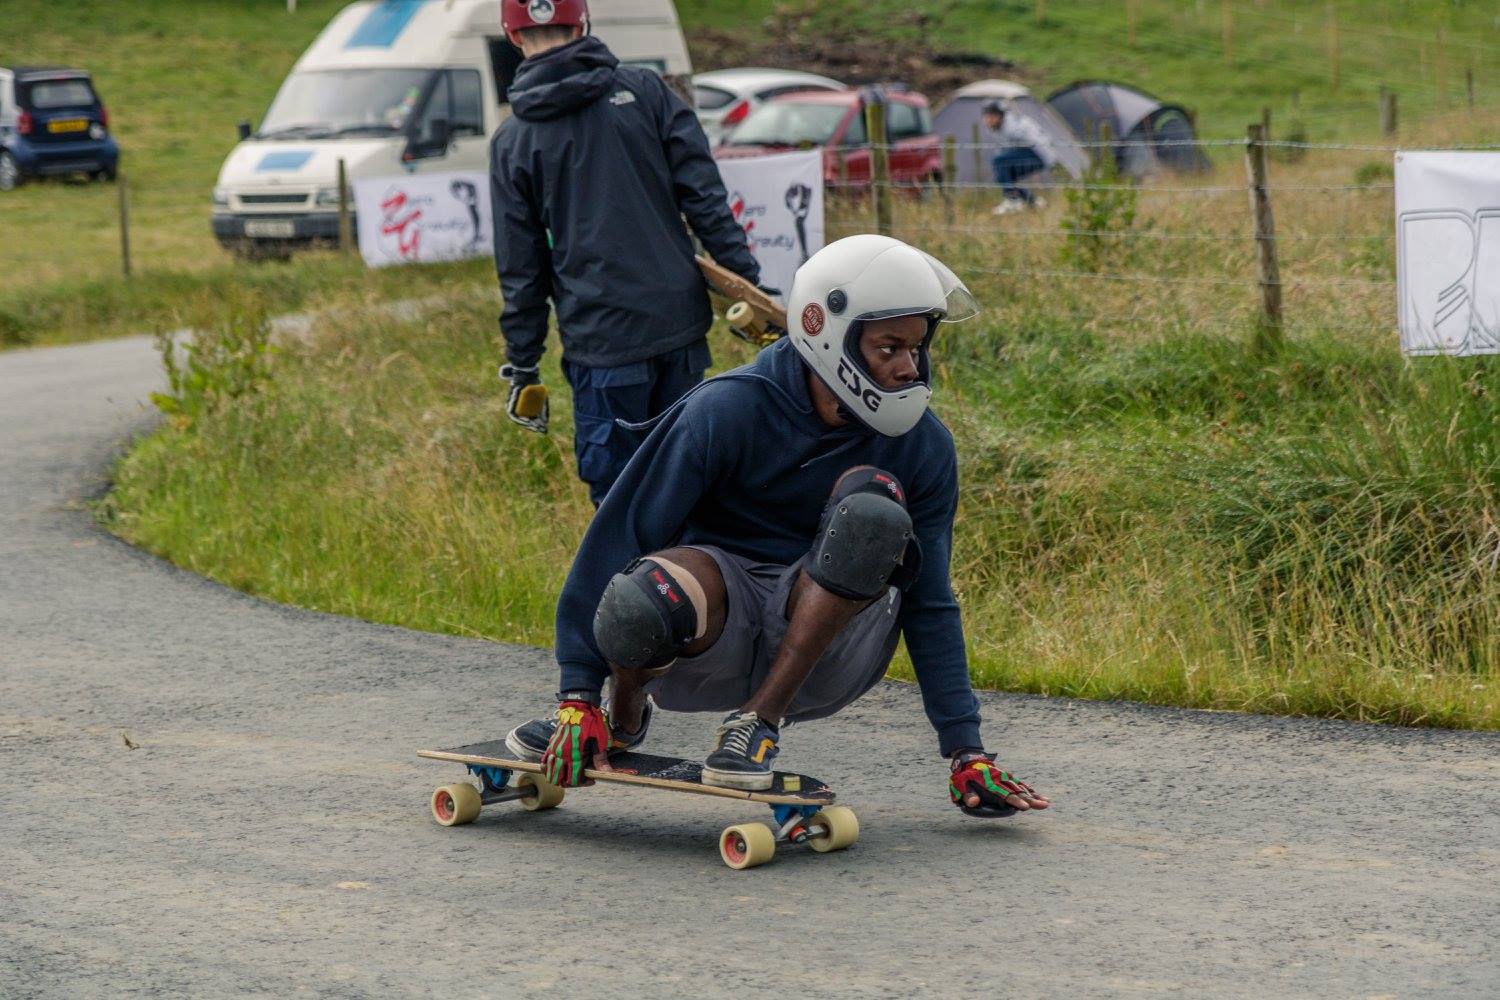
Get comfortable squatting on the board (in the “box”)
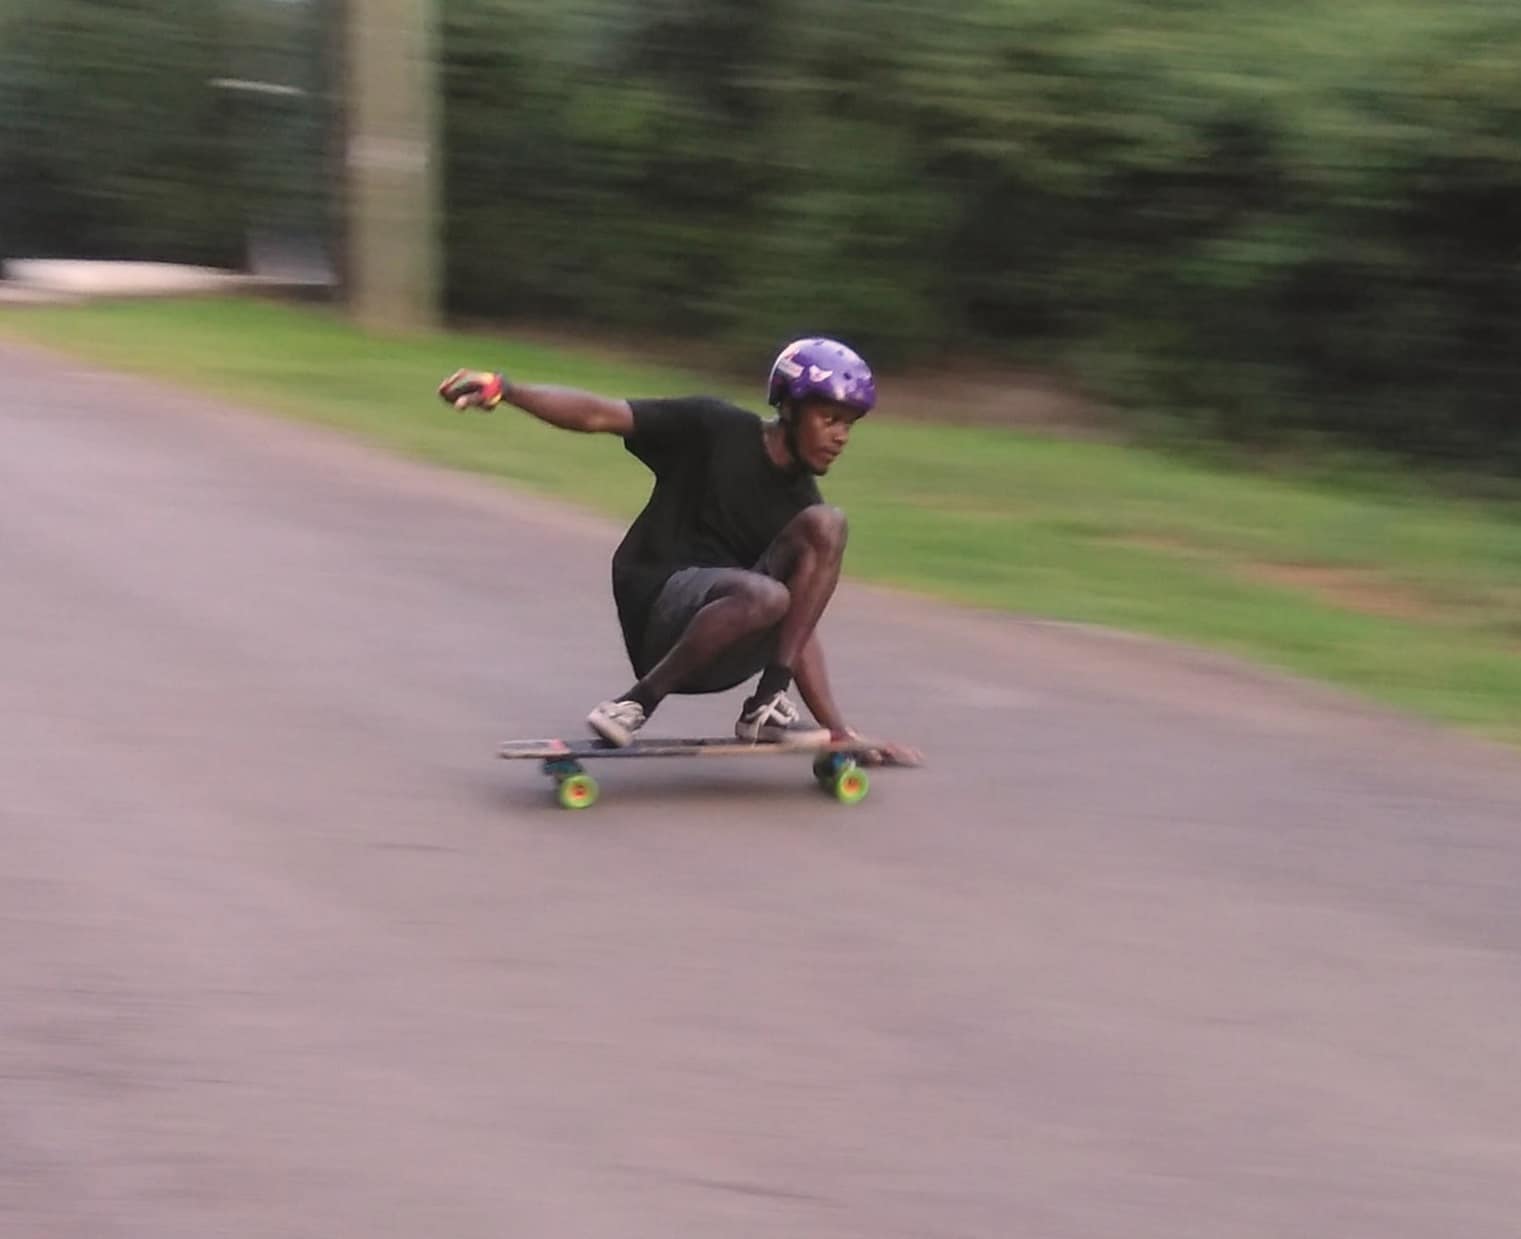
Being able to squat comfortably on your board is essential to being able to heelside slide and Coleman/pendulum slide. This is with your heels flat and legs about shoulder-width apart, something approximately like the image below. Take note, that the image below is an action shot and your squat may not necessarily look like this. Different people have different body types so they don’t necessarily slide the same. Check out the examples section below to see how different riders do it.
You can also lay your back foot more on your front leg, lean your front to the left (to the right if you’re goofy), lift the inside of your front foot more etc., to allow you to get lower and be more comfortable. 
Your body positioning doesn’t have to be picture perfect. A lot of people compensate for their lack of flexibility by grabbing rail to help pull their bodies into the board. However, if you’re compensating this way, it could hinder the well being of your legs in the long run. Some people (like me) have had slightly damaged knee ligaments from doing this. It will allow you to learn how to slide quickly tho.
I recommend stretching and doing regular hip stretches to improve how you squat, so that you can do it comfortably and naturally on board.
Get the foot positioning right
Foot positioning naturally comes to most riders. As a rule of thumb, you want your feet to be about shoulder-width apart. You want them (particularly your front foot) to be positioned in a way you have good leverage turning left or right. You can also shift your feet position for turning in either direction so that you have enough leverage to turn/slide comfortably.
Heelside foot positions
Below is a guideline for how you should position your feet when try to turn heelside (and eventually do a heelside slide. The image and the positions are simply guidelines. You don’t have to stick to them, but they should serve as good starting points for you to be able to turn heelside confidently. The red highlights where to be putting pressure so you can turn decently. If the image isn’t clear, click on it to open in a new page.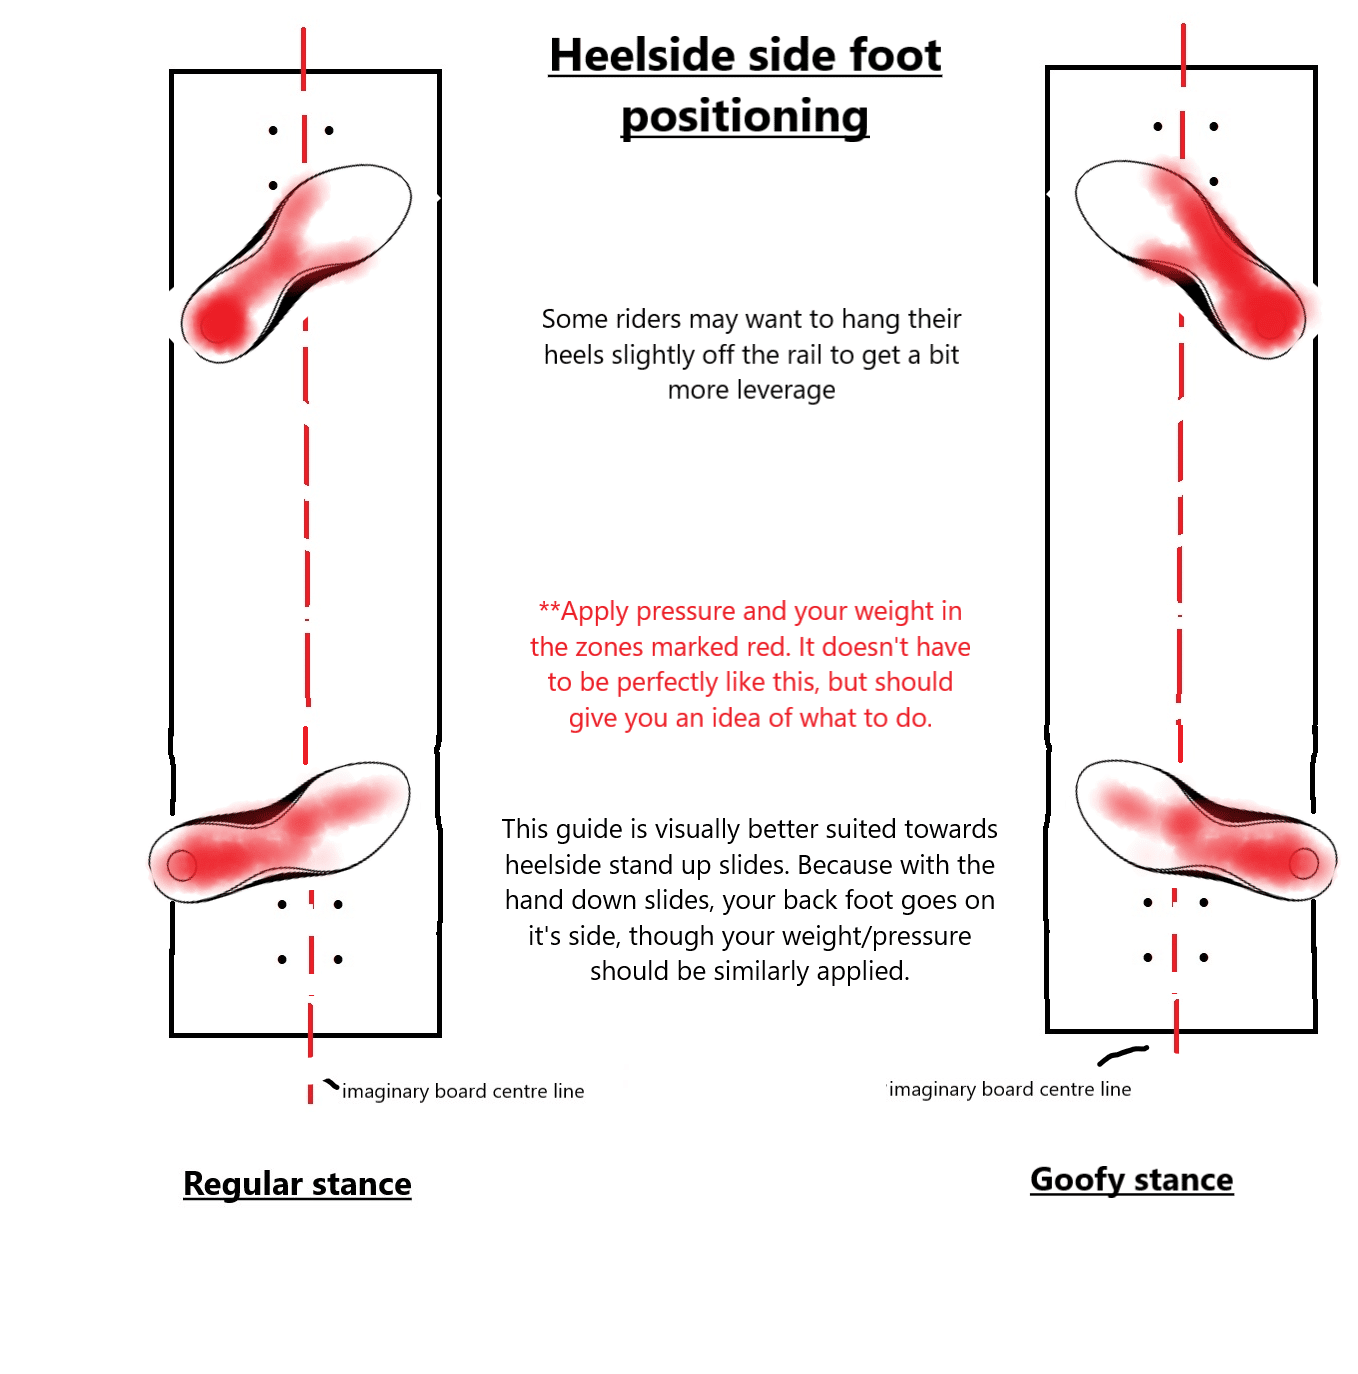
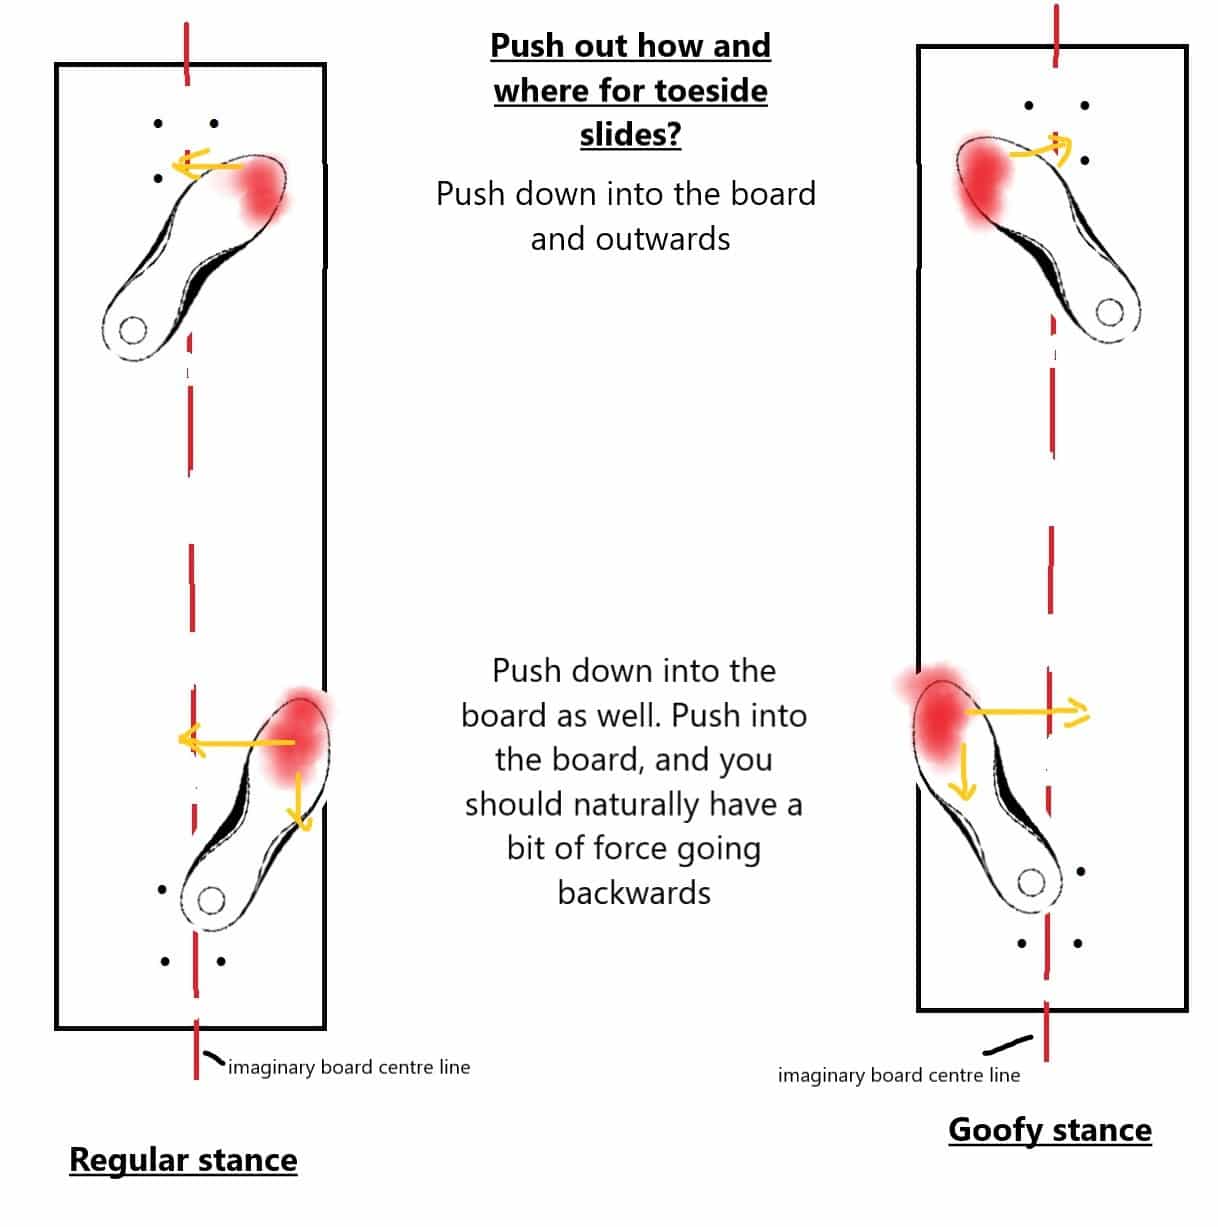
Toeside foot positioning
Below, is the suggest toeside foot positioning when turning toeside and attempting to do toeside slides. Again, you shouldn’t follow this strictly, but it should give you a point to start from. You can adjust to a position you are comfortable with.

How to set up carve and slide? Some images to help & a guide
Set up carving is key to sliding. If you can’t do it you’re gonna give yourself a lot of trouble and extra work. It’s key you get it right.
If you want to slide going to the right, refer to the image directly below. Simply follow the curve and try to implement it in your riding. For sliding to the left, refer to the second image below. Again, if they aren’t clear, click on them to open clearer versions. Either image can be used for both the goofy and regular rider. Just apply and use the image for the direction you want to slide,
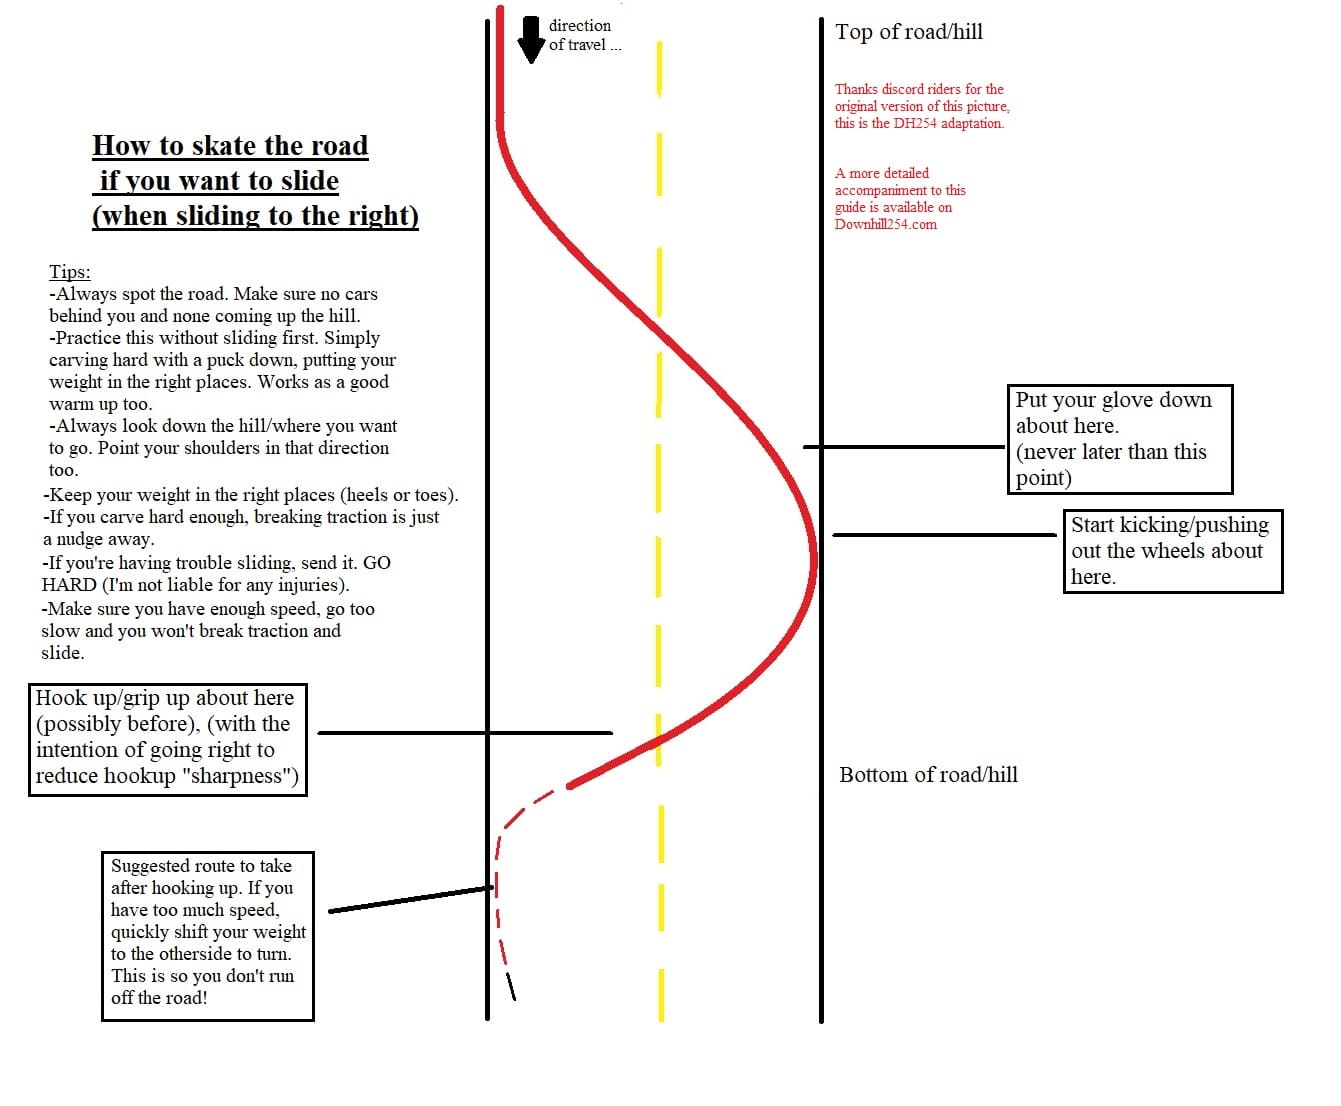
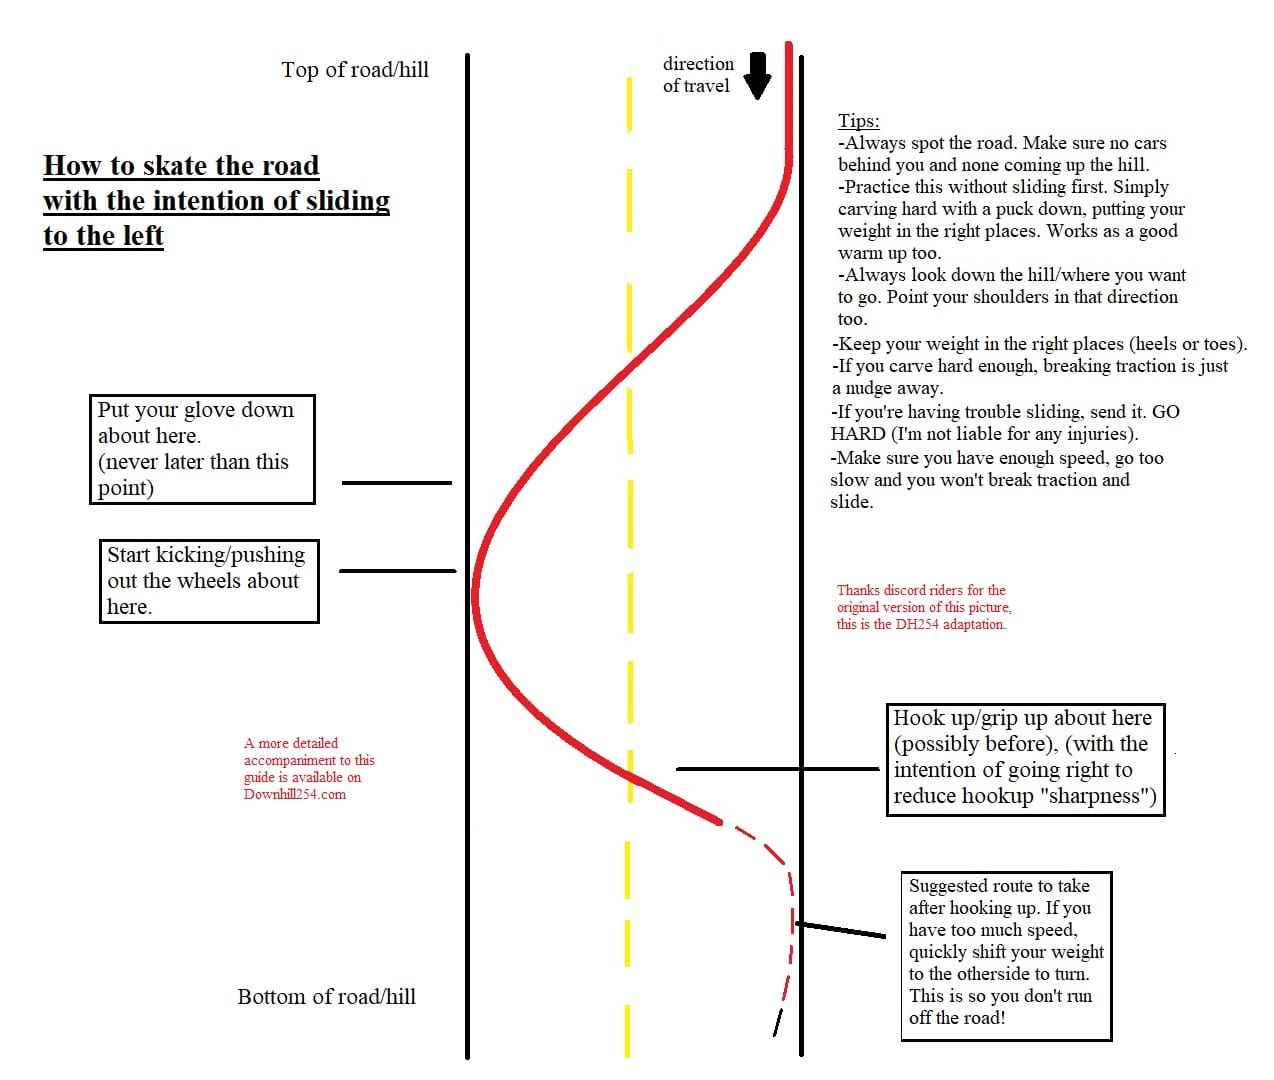
You can read an in-depth guide to set up carving here.
How to slide on your longboard
How to do a Coleman/heelside pendulum slide (longboard slide with gloves)
You can check out my indepth Coleman guide here. It covers everything more indepth than the guide below and has step by step instructions that are well illustrated and explained. It also differs a bit in technique to the one below. I think it is superior, but you might be better off looking and learning at both.
Invented by Cliff Coleman back in the 70s, a Coleman slide is one the most reliable ways to slow down on your longboard. It can simply be described as:
- You setup carve, taking a big turn toeside with the intention of turning heelside after you’ve carved as hard as possible
- Getting into a squat position, with your legs/feet shoulder-width apart. Take a look at the image below to see what the squat position typically looks like.
- Swinging your shoulders and arms out to break traction, as you get to the crescent of your toeside carve, when you’re about to initiate the heelside carve.
**When you rotate and swing your body, you do it until there is no more traction. Or to the point of braking traction. You don’t really force the board into the slide. You “encourage” it by rotating/swing to the point of traction loss. A friend describes it this way “You turn so hard that the board loses traction. If your body is in the right position this will be controlled.”
- Swinging back your shoulders to help your board turn back into the direction of movement, so you can regain traction and roll away.
- Also, gently pushing and applying more pressure on your front foot can encourage the board to come back the other way.
The squat position varies between riders but generally looks like this.
Some key points:
- The slide is lead by your shoulders. Whatever movement your shoulders do affects your whole body and what happens in the slide.
- Place most of your weight on your heels. You can consciously do this by placing pressure on your heels and the middle of your feet.
- For your weight distribution, you want it to be about 40-50% on your front foot and 30% at the back, and 20% on your hands.
- You want to always be looking down the hill, keeping your head as straight as is comfortable, and allowing your body to do the rotating/pendying.
Some Coleman tips
- Aggressively throwing/rotating your body can help break traction if you’re having problems with that. However, you can slip off your board if you aren’t careful.
- A big setup carve will make breaking traction feel easier and smoother.
- You can also grab the board with your free hand to help you stay on. However, grab behind your back knee and not in between your legs. The picture below is a good example of how to rail grab. Grabbing between your legs is called Stink bug and is not advised.
- You should also be going relatively fast. Without much speed, you won’t be able to pendy properly. You might be able to swing the board 180*, but you won’t be able to bring it back because you’ll be going too slow to keep a continuous break in traction.
How to do a toeside pendulum slide
You can check out my indepth toeside pendulum guide here. It covers everything more indepth than the guide below and has step by step instructions that are well illustrated and explained. It also differs a bit in technique to the one below. I think it is superior, but you might be better off looking at and learning from both.
A pendulum toeside slide is very similar to the Coleman. You use your shoulders a lot and swinging them helps you rotate your body 180* in either direction. Here is how to do it:
****I will be talking about doing a toeside pendulum slide grabbing rail. It is more or less the same not grabbing rail, but what your shoulders do plays a bigger role.
- You again carve heelside as hard as possible, with the intention of doing a hard toeside carve once you get to the zenith of the heelside carve.
- You hold on to the board and swing your shoulders to the right (or left if you’re goofy).
- At the same time as swinging your shoulder, you put your weight on your toes. You can consciously do this by putting more pressure on them.
- At the same time, you also put your back foot out a little bit, to encourage the back to swing out and break traction.
If you do this correctly, the board should lose traction and you should be on your way to doing a 180° turn. But before you fully go 180°, you do the below so you can bring the board back.
- You release pressure on your back toes and start putting more pressure on your front toes and pushing them slightly. Do this gently so as to make this shift in pressure smooth. It should allow you to remain in control.
- At the same time, you start swinging and bringing your shoulders back in the other direction.
- Also, pulling your board can help you turn it in the swing. Be careful not to pull it too hard.
As you do these things, anticipate the hook up from the slide. It can sometimes, be harsh and sudden.
- As you hookup, try to bend your knees to absorb the momentum from it.
- You should be able to roll away safely.
For an extremely over the top example, check out how Aaron Hampshire does it in the slow mo clip below. Though is a good demonstration, he doesn’t do the biggest of setup carves. Because he is experienced, he knows how to adjust his weight and slide so he can do them without a setup carve. A beginner should ALWAYS set up carve more than he has done.
https://www.instagram.com/p/BJI-QIsg0tF/
Some toeside pendulum tips
- Make sure you have enough speed, otherwise you won’t be able to break traction at all.
- Big setup carves will make your toesides smoother and easier.
- The key to being confident in toeside pendulum slides is putting pressure on your toes and getting the timing for shifting your pressure to the relevant foot. Pressure on your toes allows you to stay in control of your board, and you can confidently control what it does.
- Try to keep your head and eyes looking down the hill, or where you want to go. Your head and shoulders naturally follow your eyes. Because the shoulders sorta lead the direction of the slide, you don’t want to do anything to make them do the wrong thing.
- When you start to swing back, the board may want to get away from you. If it starts going away, try to be gently, and feather like with your movements to keep it in control.
How to do a heelside slide/predrift
You can check out my indepth heelside predrift guide here. It covers everything more indepth than the guide below and has step by step instructions that are well illustrated and explained. It also differs a bit in technique to the one below. I think it is superior, but you might be better off looking and learning at both.
This is the slide I struggled to get down the most. I had to do a lot of work to get myself flexible and limber enough to squat properly. Also, if you aren’t comfortable doing the pendulum slides, doing these will be a bit harder. Anyway, here is how you do it:
- Like with the pendulum slides above, you start with a deep toeside carve, with the intention of sliding when you get to the zenith of the turn.
- As you get towards the tip of the turn, you get low in the “box” position.
- You put a hand on the ground and shift most of your weight to your front foot. You should have about 65-80% of your weight on this leg.
- Remember to put pressure on your heels.
- After putting the hand down, you kick out the slide by gently rotating your hips, OR gently pushing out with your back leg.
Now, I say gently, but it’s more like a very forceful, but controlled push. You have a lot of pressure and power behind this leg, but you exert that power and force gently.
- As you push your leg out, remember to push it into the board as well. Again, remember to keep pressure and weight on your front foot, particularly the heel and just behind the arch.
- As you push out the leg, keep your shoulders and hips pointing where you want to go. In a corner, this would ideally be the apex of the turn. A good way to do this is to simply keep your head/eyes focused on where you want to go.
- To hold the slide at that given angle, maintain pressure on both your feet and just allow the board to slide and do its thing.
- When you’ve slowed down as much as you want, begin releasing the pressure on your back foot.
- You can either simply release pressure to pull your back foot in, or actually pull it in. Either works, but I personally prefer the first because it is more controlled and has a mellower hook-up.
- Maintain the pressure on your front foot throughout bringing your front leg back. If you want to straighten out the board more, you can push your with your front foot gently. Again, this is a strong but gentle push. You want to do it about the same time your back foot pulls in.
- As you feel your board go into gripping up, you can then start to lift your hand up.
https://www.instagram.com/p/B22H_s6gmf3/
Some key heelside predrift tips
- Practicing heelsides predrifts will always be a lot easier at a corner. You will have something to aim and point your shoulders and hips at.
- When maintaining pressure on your front foot, it’s almost like you are pushing it out as well. You aren’t, but that’s what it can feel like.
- If your feet don’t have full contact with the board, it can make sliding and controlling the board the way you want to a bit more difficult. Try have your front foot as flat as possible and the length of your back foot in full contact with the board. That said, some lift on your feet is ok, and a little of it won’t kill you.
- As Liam T points out: “hip and knee pain is common, people need to stretch”. Flexibility plays a key role in doing heelside slides. If you can’t squat comfortably, you might have issues with it. I expound more on this below.
- If you have a problem doing a smooth transition from gripping to sliding, focus on getting as low as possible first.
How to do a toeside predrift
You can check out my indepth toeside predrift guide here. It covers everything more indepth than the guide below and has step by step instructions that are well illustrated and explained. It also differs a bit in technique to the one below. I think it is superior, but you might be better off looking and learning at both.
The toeside pre drift is on average, more challenging than the heelside. I found it to be a bit easier hands down than heelsides slides, but toeside stand up slides took me forever to get down. Anyway, here is how you do it:
**Again, I’ll be talking about doing a toeside predrift when grabbing rail. It is a similar process to slide the board when not grabbing rail. In fact, some riders find it easier to do it that, but I digress.
- Once again, you take a deep carve, this time heelside. When you’re about to get to the tip of your turn, you shift your weight to the other side with the intention of sliding and kicking out your board.
- Again, you want to keep the pressure on your front foot. This time, try to focus that pressure as best as you can on your toes.
It’s hard to get enough leverage from simply putting pressure on your toes, so I recommend you pick up a footstop to give you something to push against when doing toeside slides.
- You should also have pressure on your toes of your back foot.
- Your weight distribution at this point should be about 45-60% on your front foot, about 30% on your back foot, and finally about 10-25% on your hands.
- In order to make the back drift out, you kick out at the zenith of your heelside carve.
- You push the board out with your back toes/foot. Again like the heelside, this is a firm, strong push that is gentle and slow.
- As you do this, you should remain posted up on your front foot, keeping your weight and the pressure on your toes.
Again, like the heelside slide, look where you want to go and keep your shoulders pointed in that direction.
- With pressure on your foot, you can control the angle the board slides at.
But you’re typically locked in to a given angle once you start sliding. You can decrease this angle by decreasing the pressure on your toes, but you can’t really increase it. You need to choose the angle you want to slide at beforehand.
- As you release the slide, keeping pressure on your front foot allows you to straighten out the board for a smoother hookup.
- As you release pressure on the back to allow the board to stop sliding, anticipate the hookup, and bend your knees to absorb the momentum. Bending your back knee, in particular, will help you absorb this momentum and make the hookup feel less harsh.
https://www.instagram.com/p/B99w41Xp-MZ/
Some key toeside predrift tips
- Make sure you’re going fast enough.
- Imagine your front foot as a pivot and your back leg as the rudder that controls the angle of the board according to that pivot. In line with this thinking, your front foot should be planted, pushing against the board.
- If you’re scared of high-siding, remember to setup carve properly and put pressure on your toes. By keeping pressure on the toeside side of your board, you decrease the likely-hood of high-siding.
- A good way to put pressure on your front leg is by simply straightening it and pushing it into your board.
- The angle you want your board to be at when you slide, will determine how strongly you kick out.
- I like to load the board by getting it into a turn (after the setup carve) before kicking it out. When you watch my toeside clips, it looks like a slight hesitation before the slide. I also like to bend my knees going into the slide and then straightening them out once I get the slide going. This makes the transition between gripping and slipping easier and I feel I can control the board better.
- For the pushing of the back foot, for me it feels like I pushing backward, to the side and down at the same time. Pushing down allows for better control as the wheels slide smoother. Pushing backward just happens sorta naturally.
Key pre-drift tips
- In the pendulum slides, your shoulders do a lot of the work, dictating how you slide. In the pre-drifts, your hips and legs take on most of the work. Your shoulders and arms are there to help you balance in the slide and help you hold the angles you want. Your hands can also help you hook up smoother from slides by acting as counterbalances.
- If you want to get your pre drift right, always remember to setup carve for the corner well. It will make it a lot easier to keep the board at an angle less than 90.
- You should also consider making your back truck a little bit tighter than your front. Maybe, a half-to full turn of the kingpin nut will give it the right feel. This just allows the back to start drifting before the front. It makes the back want to drift instead of turn, and it wants to drift/slide-out before the front truck does. This won’t affect your normal riding, and your setup will feel the same for the most part.
- How you hook up in reference to the direction your traveling will determine how smooth and controlled your hookup from the slide will feel. For example, if you want to go straight, but you hook up at an angle to where you want to go, you will likely wobble and get thrown off your board on the hookup.
- So, if you can’t position your board in the direction you want to go. You should position your body in a way you are able to soak in the harsh hookup. You can also push the board out with your front foot at the end of the pre-drift to help you straighten up as you come out of the slide.
- Half the battle of pre-drifting, is knowing how to position your body for the hookup if you know it’s going to be harsher/unforgiving.
How to stand-slide up on your longboard (longboard slide without gloves)
You can check out my indepth stand-up slide guides (both the check and 180s) here for the heelside standup and here for the toeside standup. It covers everything more indepth than the guide below and has step by step instructions that are well illustrated and explained. It also differs a bit in technique to the one below. I think it is superior, but you might be better off looking and learning at both.
We’re finally at the stand-up slides. These can be challenging initially, but get easier the more you do them. They usually follow this pattern:
- Set up carve
- Compress (bend your knees) during the setup carve
- When you get to the zenith of the set up carve, you put pressure in the relevant place on your board. Your toes for toesides and heels for heelsides.
- You should have about 60% of weight on the front foot and 40% on the back.
- You then give the board a nudge and kick it out.
- As you kick the board out you decompress (unbend your knees). This sort deweights your board and makes it easier for your wheels to break traction.
- At this point, you should hopefully be in the slide, gliding along. To hold it out, you just stay relaxed, with pressure in the relevant places.
- To guide the slide, you look where you want to go and have your shoulders facing that given direction.
- When you’re ready to hook up, you start by slowly releasing pressure on your back foot, but maintain about the same pressure on your front foot. This should help you straighten out the board.
- As you release pressure on the back foot, begin to bend (compress) your knees in order to absorb the momentum and make the hook up smooth.
Now, if you do these movements correctly, the slide can (and should feel) sort of effortless. Because it’s not about fighting the board to make it slide, but rather guiding it so that it slides and breaks traction naturally. This usually gives rise to better, smoother, more controllable slides at all speeds. It then just becomes a matter of timing, learning when to push out the wheels or bring them back in.
https://www.instagram.com/p/B94pljxn9sr/
https://www.instagram.com/p/CBEsjJUpRRy/
https://www.instagram.com/p/BvGwIusgMeV/
How to sit down slide
The sitdown slide is a bit different. There is no decompression for the slide. You do a set up carve, but you use your back leg to act as a rudder to kick the board out. You want to put most of your weight on your front foot (about 70-80%), with the rest on your back leg.
When you kick the board out, you should ideally have pressure in the right places to keep it sliding and to stop you from high-siding. When you’re done sliding, you pull your back leg in and push out a bit with your front foot to get the board to straighten out, grip and roll away.
https://www.instagram.com/p/BiumyJzgqkW/
Some stand up tips and tricks
- Practice doing and holding out 180* slides if you want to get the confidence to do bigger slides. These are easier today because you simply do a big 180 slide, without worry of a harsh hook up.
- Keep pressure in the right places.
- Don’t forget the basics, film yourself to see if you are doing them correctly. A big mistake people do, is not doing the compression, decompression etc. They carve and just try to force the board out. This will get you nowhere and will stress you out forever.
- Again, a footstop can help you with toeside slides.
- For sit down slides, too much weight on your back leg can make your knees hurt.
Which slide should you learn first?
The hands-down pendulum slides are typically what most riders learn first. Even if you’re coming from skateboarding background and can already do powerslides, I still recommend you learn them. But between the pendulum slides, you typically learn whichever feels most natural.
Some sliding tips, information, and observations
How and where to apply weight for the slides – some illustrations
Where to put your weight for the heelside slides
For the heelside slides, the image below can help you visualize and understand where you are meant to be applying pressure and weighting your board. Again, this is just a rule of thumb, find whats comfortable for you. If the image isn’t clear, click on it to open it in a new page. A clearer image should show up.

Where to put your weight for the toeside slides
For the toeside slides, the image below can help you visualize and understand where you are meant to be applying pressure and weighting your board. Again, this is just a rule of thumb, find what’s comfortable for you. If the image isn’t clear, click on it to open it in a new page. A clearer image should show up.
How different riders slide
I think it’s important to highlight how different riders slide so as to expose you to different styles of sliding and how different riders execute them. This is to help you see that different riders do it differently. Everyone does it in their own way. So instead of forcing your body to replicate someone else’s style, you should find what works for you and is comfortable.
Josh Neuman – stand up
If you’ve picked up longboarding recently, you’ve likely watched and been inspired by Josh’s videos. Josh has a very
Troy Yardwaste – stand up
Troy has a more unique style. He slides with his back leg on the kicktail. This really isn’t “proper form” and I personally don’t recommend you slide like this. When you have your leg this far back, or behind the back truck, it makes it easier for you to get wobbles at higher speeds. It also doesn’t give you optimal control over your board.
However, it does make it a lot easier to make the board break traction and slide. If you can handle the drawbacks of having your back foot that far back, then this style could work for you.
Ian Freire – stand up
One of the riders I turn to when I talk about form and consistency in technique. Ian Freire is one of the best stand up riders around. He skates like he is writing poetry, and it’s hard to get tired of his style. He is super consistent with the compression, decompression etc. style in and out of his slides.
Another rider with great form and technique would be Patrick Lombardi. Both these riders have very consistent technique. I had to pick riders to model your style after, it would be Ian Freire and Patrick.
One thing all these stand up skaters have in common …
As much as they all have different styles, you’ll notice that they consistently (especially in the case of stand up slides), set up carve, compress, and decompress to kick out the slides, and then compress on the hookup. This is what makes a pro a pro. They are so consistent in their basics that they do it in each and every slide. – This is more apparent in skaters who do really, really fast stand up slides.
And if they don’t do it, they are probably sliding into a corner where they don’t need to compress to absorb the momentum of their board. So the takeaway is this, If you’re practicing stand up slides, always practice the basics of compression, decompress blah blah. It will make your life easier and you’ll be a stand-up god before you know it.
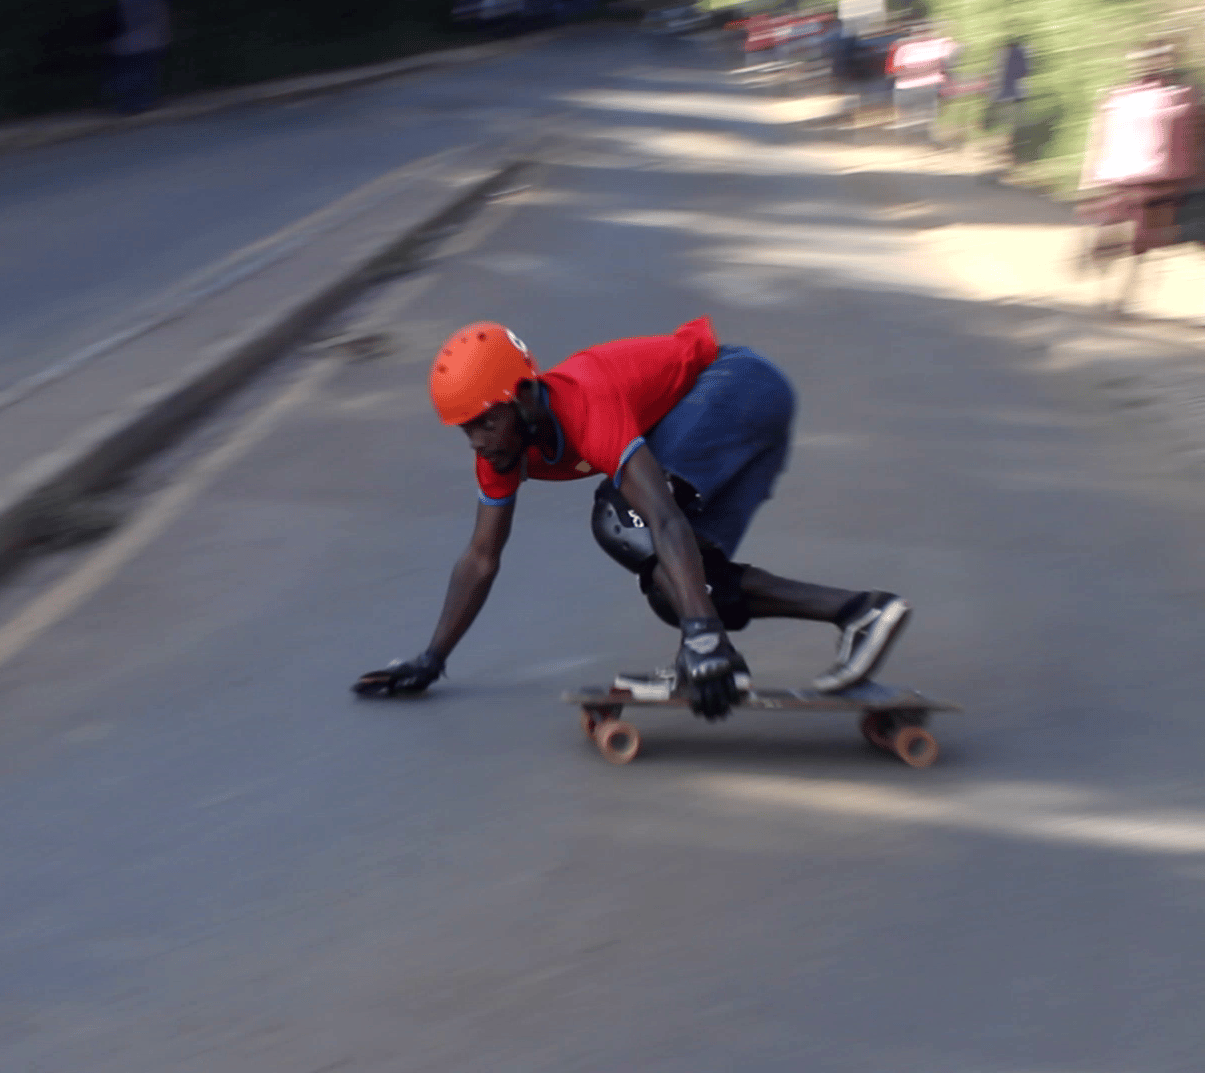
Nick Broms
Nick (rider with the orange shirt and blue helmet) has a unique riding style, where he’s able to focus 90% of his weight on his front foot. This allows him to be really posted up on his front foot. He’s also very flexible, so he’s able to do this relatively easy. You won’t see a ton of other riders skating like him.
https://www.instagram.com/p/B-u-6h9JPAr/
Adam Westfall
Adam slides like the best and has the track record to prove it too. His style of riding doesn’t really conform to the “rules” of what perfect form looks like. However, it works for him and it doesn’t hold him back. He can take open roads as fast as he likes, staying in his lane the entire time. He can compete at the highest level of our sport with no issue.
Daniel Engel
Another guy who doesn’t conform much to the rules of “form”. Daniel’s front foot noticeably lifts up during heelside and toeside slides. Whilst you’ll find a little lift amongst most riders, it isn’t common to find as much lift as Daniel front foot does. Still again, he makes it work for him. The lift doesn’t hold him back and he can skate open roads and compete at the highest level of skating with no issue.
https://www.instagram.com/p/BdXtQTvhJx3/
Daina Banks
Daina has one of the more unique stances when sliding. He simply doesn’t play by the book. Both his legs are fully upright when he is doing heelside slides. Normally, you’d have the back leg bent over a little bit as it can give you a bit more control during the slide. Dana does his own thing and just slides how he wants. Again, it does not hold him back and he regularly competes at the highest level. – he was runner up for the 2019 World title.
https://www.instagram.com/p/BoSa54uAj41/
Lyde Begue
I had to include some ladies to balance out the list. Lyde is a great rider from France. You’ll notice, she sits a lot lower on her board, with her ass closer to the ground. You’ll notice a lot of female riders do heelside slides this way, with their butt super close to the ground. Is it intentional? No idea, but I’ve seen enough women do it to call it a trend. They also seem to push against the board, rather than sit down on top of it like most guys do. I might be talking shit, but I might also be right. I don’t know how it affects riding, but it’s an interesting thought.
https://www.instagram.com/p/BuuDooQh8-M/
Tidbits to help with longboard sliding
How to set up your board for stand up slides …
There are two types of people when it comes to sliding. The first is those that like to push into their wheels when sliding and like to ride a really loose setup.
Ryka Mohamadian is a good example of this. He likes to push into his wheels when sliding and rides the loosest set up known to man. Watch the video below to see how he pushes into his slides and his board. His style is hard to replicate and very few riders slide and skate like this.
You then have those that like to “float” on top of their boards as they slide. They don’t really push into the board, but kinda hold the slide and glide along with it. Cole Trotta is a good example of a rider with this floater style.
A floater style rider like Cole typically has a setup that is on the harder side of things. Their setup has a large center, so they can comfortably sit on the board as it glides along. Another good example would be Josh Neuman. Josh pushes out his slides and just glides on top of them. His setup is quite tight – (I think 93a/90a bushings on 165mm Savants),
I recommend picking up/building a setup that works like Coles and Joshs. This is the most forgiving setup for doing stand up slides and will allow you to be comfortable when doing them. To get a setup like Coles, I recommend you use cupped washers roadside and more voluminous bushings boardside. You’ll need to experiment before you get it perfect, but this is generally the way to go.
Join these groups to get help with bushings
Getting the right feel from your bushings can take some work. So I recommend talking to experienced riders to help you get on the right track. These groups below are full of experienced riders and they’re always willing to help beginner riders.
Other groups you can join and ask for help are linked below. However, these don’t have very many experienced riders and you may sometimes get bad advice from less experienced skaters (when talking about bushings). Still, they are better than nothing.
How to warm up for sliding
Skateboarding is like any other sport, you need to warm up. Dynamic stretches help your lower body get loose and flexible. Hand drag carving as mentioned helps you get familiar with your setup. I will create a guide to stretches I’ve found useful for longboard later on, but for now try follow this routine.
The importance of flexibility for sliding
A lot of the time, I find that people simply aren’t flexible enough to slide. This is especially true with the heelside slides. People either can’t get in the squat comfortably, and have limited range of motion in that position. I’ve found that the key to being able to heelside slide well (and comfortably) for me – is being able to support my weight on my front leg, and being able to squat comfortably and have decent internal and external hip rotation.
I used to have atrocious flexibility. I could not squat for the life of me and doing heelsides was always uncomfortable. To compensate for my lack of flexiblity, I used to grab rail and I would always pull hard so I could be on top of the board. This would hurt my back knee as it would put a lot of pressure on my ACL and other knee ligaments. It was not a sustainable way to skate.
Fortunately, after finding and experimenting with different hip and lower body flexibility routines, I found a couple that worked for me. I was able to target specific problem areas and really improve my lower body mobility. Though I still can’t squat 100% comfortably, my lower body mobility is a lot better than it was. I can skate comfortably and in a way that doesn’t damage my body. The picture below should highlight this.
Find a good practice a hill
A good practice hill has the following features:
- It mellows out at the bottom (or goes uphill) and naturally slows you down from high speed.
- It has a corner, so you can practice taking turns and pre-drifts in the future.
Having a hill that lets you practice your technique and skating is important if you want to get good quickly. It’s true that you can learn on any hill, but having a good one will certainly help your skills along.
It doesn’t have to be one hill that has all these features. You can have several and skate them interchangeably if you want to work on different things. Remember to have a spotter for corners if you can’t see over them.
Practice sliding in the rain
Practicing sliding in the rain is a cheat code. When the ground is wet, your wheels have a lot less traction and can break out into a slide very easily. So you can learn to slide within minutes of trying. And the beautiful thing is this knowledge and experience transfers over when trying to slide in the dry.
Because you’re familiar with that feeling of your wheels breaking out, you are able to go harder and swing your board in a way that it will actually break out. So if you’re having trouble learning to slide in the dry, give it a go in the wet. That said, I am not liable for any bearings damaged in this process.
Film yourself
Filming yourself helps do a few things:
- It shows you what you’re doing wrong. Maybe you’re not turning the way you thought you would, or are taking a wrong line.
- Shows you that you’re actually improving.
- Shows you how you’re skating and interacting with the hill.
- Gives you something to show other skaters so they can give you pointers – words can only do so much.
- Gives you something cool to post on social media and share the stoke.
Filming myself definitely helped me get better. It allowed me to see areas I had problems with and what I needed to work on. It was also nice to see myself progress.
Other good guides to read?
I’m bound to miss out on one or two things. So here are some guides to check out. They’re all generally the same and give similar advice, but one might have that piece of the puzzle you need to get to unlock this new skill.
- Reddit guide to sliding
- How to stand up slide – Muirskate
- How to slide and freeride your board – Loaded Boards
Troubleshooting
Practice makes perfect
You’re not gonna get sliding the first day, or the second. You might get lucky and get it on your first try, but it usually can take lots of tries to get it down. Finally, a lot of sliding is trial and error. As much as I can give you the steps, there are small things that will matter only to you and your technique. You have to figure it out for yourself.
Downhill skating has a steeper learning curve in comparison to other sports. The only advice I can give you, is don’t give up and keep going. It’s all worth it in the end.
Are you sure you’ve set your board up properly?
Though you can slide on any board, having one set up for it will make your life loads easier. As I said earlier, a “specialized” with properly setup trucks and wheels will always be easier to slide than a board not built for it.
For example, a board with cone bushings will turn too much and have a sharp hook up. A board with double barrel bushings will have a smoother break out into the slide, and a smoother hookup out of sliding.
Remember the basics
Make sure you are:
- Setup carving,
- Have enough speed,
- Compressing, decompressing … bending your knees … etc.
If you swear you are doing these things but aren’t getting anywhere, please take a video. Sometimes, what we think we are doing is not a reflection of what we are actually doing. Videos usually tell-all, and you can quickly see any glaring issues.
This is what can happen when you don’t setup carve properly
https://www.instagram.com/p/B_RLfMbJyIS/
Don’t hesitate
Hesistation is defeat, Sekiro …
Hesistation is what often leads to high sides and mistakes, and I see it plague beginners all the time. It often plays out like this:
For example, let’s say you’re going kinda fast and plan to slide, but you have a brief moment of doubt. It might not seem like much but this split second of hesitation can completely mess up whatever you intended to do. So like, if you’re trying to slide, hesitating slightly on the setup carve can lead to a poorly executed slide where you end up falling off, or something you didn’t intend to happen, happens. So yeah, hesitation is bad.
And the only real solution for this is to just keep practicing and warm up before each ride. Practice will allow those moments of doubt to become less and less, and warming up will give you confidence in your riding and sliding ability.
Finally, it sounds cheesy but repeating affirmations of confidence to yourself can help you overcome this. If you keep repeating to yourself “I can do this, I can do this…” etc. You’ll find yourself thinking less and less about negative things. It won’t help if you don’t have the skill, but it can keep doubt at bay.
What do you think? Have you found the slide guide helpful?
To date, this has been one of the longest articles I have written – almost 8000 words! Fairly in-depth and exhaustive. I just wanted to make a guide that explained and illustrated the longboard slide well, I didn’t intend for it to be this long. However, I’m happy with what it has come to be. Hopefully, it makes learning to slide easier and makes it clear what you need to do as a rider.
If you want to support me in some way, you can always sign up to my Patreon!
Once again, big thanks to Patrons Jed, Mowgii, Kasajja, and SuperBadJuJu for the support so far.
5 comments on “How to longboard slide: A beginners guide”
Landon Vance
November 2, 2020 at 5:53 pmDude this is incredible. I’ve been having issues learning glove down heelsides and I’m pretty sure the issue is flexibility. Going to do some stretches and practice the glove down carves. Thank you!
AbugaA
November 12, 2020 at 2:58 amGood to hear it’s been helpful 🙂
Mark
March 9, 2021 at 9:32 amWhen learning how to slide, is it best to get the slidiest wheels I can find? Does controlable wheels matter when learning how to slide? Thanks, Abuga!
AbugaA
March 9, 2021 at 9:49 amHey man, you want to get a slippery wheel that still allows you to have some control. The Powell Snakes are a great option. otherwsie, check out my guide here – http://downhill254.com/best-longboards-wheels-for-sliding/
[…] HOW TO LONGBOARD SLIDE: A BEGINNERS GUIDE […]