
This guide is on how to heelside predrift. Also known as the frontside predrift, this is a key skill for downhill skateboard racing and useful for general downhill riding.
This guide is part of the downhill skill progression guide. Check out the guide if you want to learn about which skills you need to learn for downhill skateboarding.
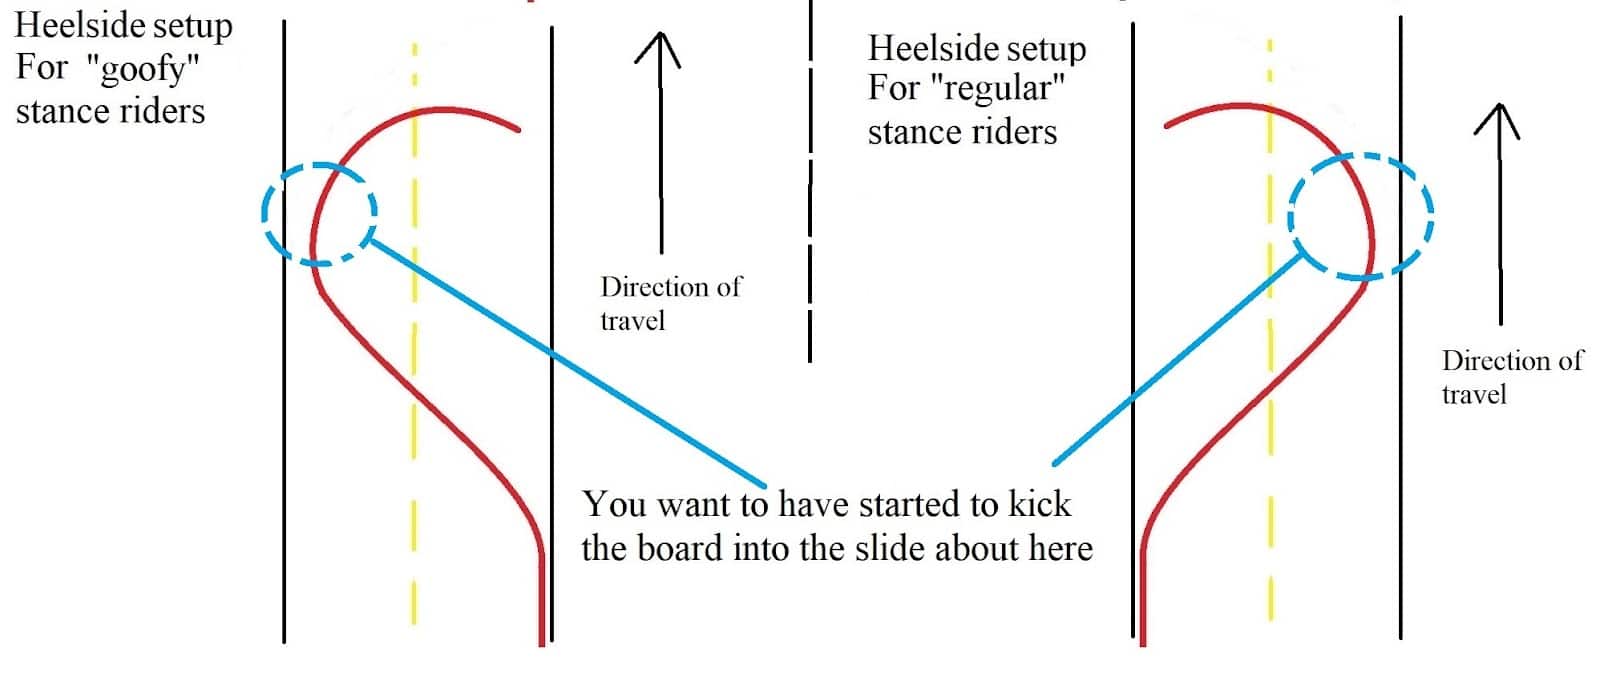
What is a heelside/frontside predrift?
This is a hands-down longboard slide, where you slide your board at an angle less than 90*. The heelside predrift allows you to steer whilst also reducing your speed through the slide. It is useful for slowing down before heelside corners.
It is mainly used during racing and open road riding as it is a great way to reduce your speed whilst also steering into a corner, to maintain maximum speed into and out of it.
Things you should try/know/find/do/understand before learning to heelside predrift
What to learn before this?
At this point, you should have already learned the toeside and heelside pendulum slides.
If not, you can check out my guides to learn how to do those.
Those slides provide you with the foundation of learning how to slide, and a way to stop in case of an emergency when learning the pre-drifts.
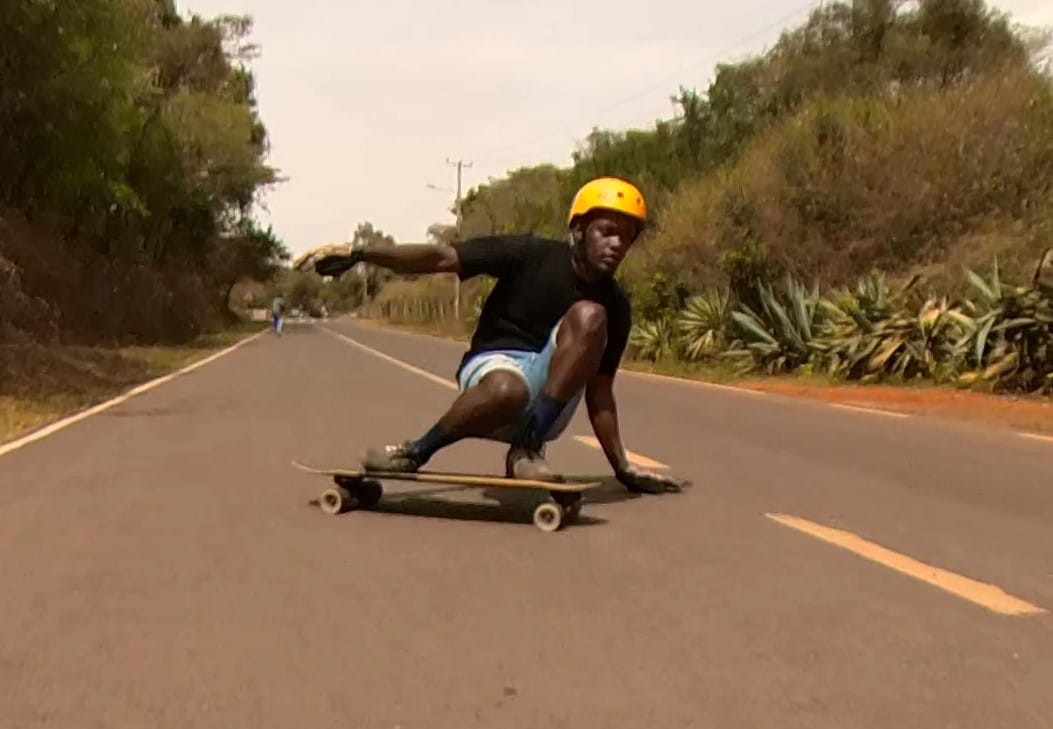
Get the body positioning correct
First, let’s sit on the ground (and then try it on the board) and figure out how best to position our body for this slide.
First, get into the box position.
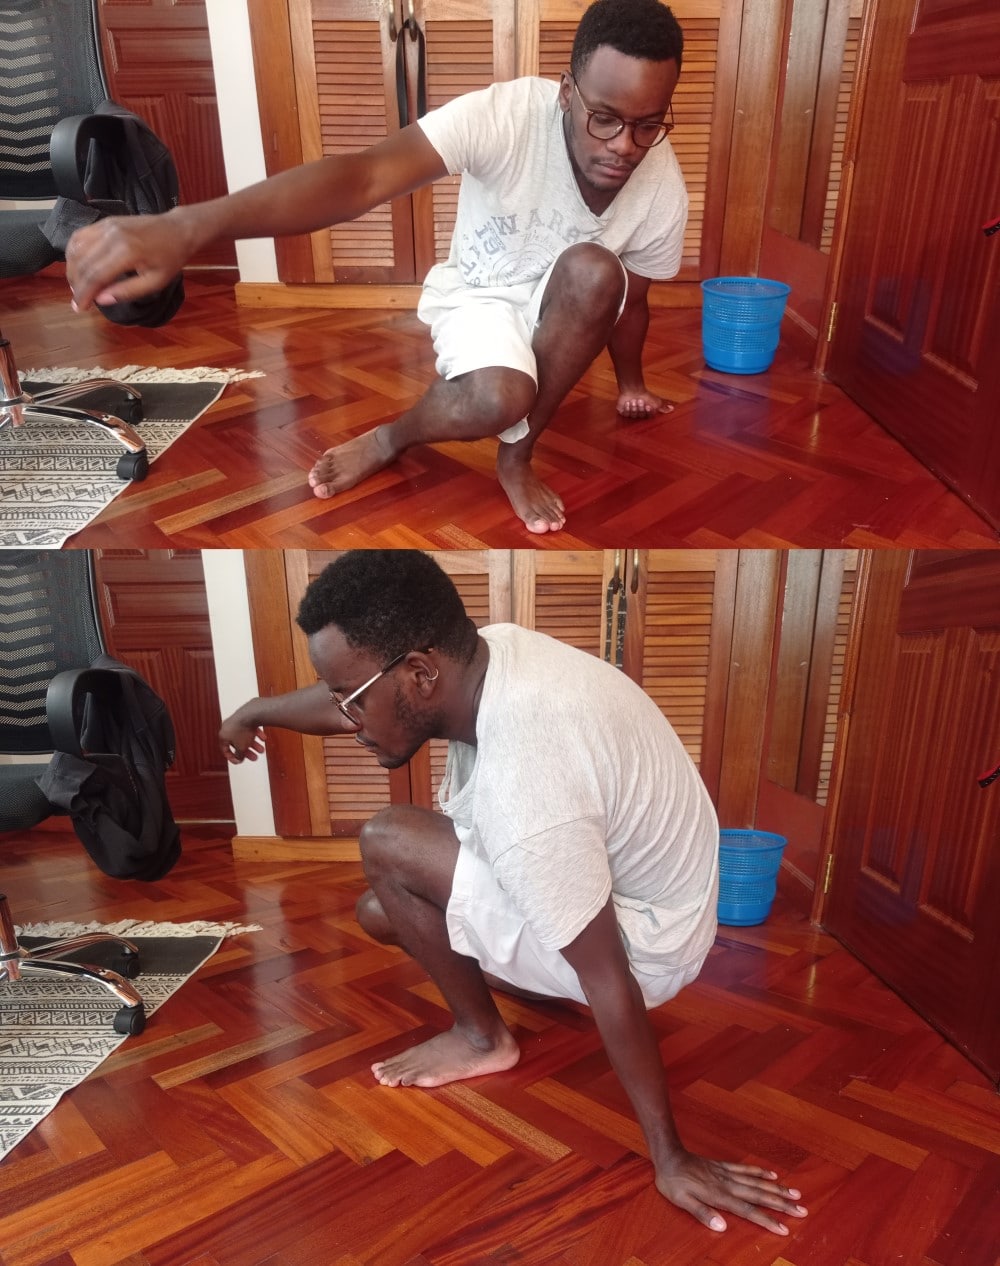
When you’re in the box position, take note of your:
- Hand position
- Where your chest is
- Where your chest and hips are pointing
- And how your rear shin is angled.
Hand position
You want your hand position to be ahead (to the side of your board/front foot) …
If your hand is behind your trucks, you will naturally rotate into a heelside pendulum slide. You want your hand to be ahead of the trucks during this slide.
Chest position
You want the middle of your chest to be in line with the top of your front knee.
This is not a MUST. But it would be ideal.
It ensures you will naturally be more over your front foot (weighting it more) than your rear foot.
It also helps ensure your front hand will be placed as far ahead of the board as we want it to be.
But this one is MOSTLY personal preference. I haven’t seen it to be universal for all riders, only some.
I recommend you experiment with it, but if it ultimately doesn’t improve performance, you can go for what’s more comfortable.
Pointing your chest and hips
You want your shoulder, and chest pointing towards the apex of the corner you will be sliding towards. You don’t really want them to be moving much. Just have them pointed squarely towards the direction you are sliding in.
You will naturally move them a little when you initiate the slide and when you hook up from the slide. But you don’t want them to be a source of movement DURING the slide.
You want your hips to move as little as possible as well; they will move in reaction to you kicking your back leg out and pushing the board into the slide, but you don’t want them to be the SOURCE of movement either.
The board wants to follow your shoulders and hips in the slide. So if you move, the board will respond and will likely end up sliding at 90* or over 90*.
Isolate the upper body
All the action in this slide comes from your legs. Your upper body stays pointing where you want to go. Specifically your shoulders, chest, and hips.
Moving your shoulders will cause your board to move. The board wants to follow your shoulders in a slide, so you gotta control how much your shoulders move.
A good way to isolate your shoulders/head/chest is to simply look towards the apex/inside of the corner. You will also hear people say, look where you want to go. Both achieve the same thing, but the apex one is better in my opinion.
Rear shin angle
The angle of your rear shin will determine the angle your board will slide at.
It will be determined by how much you push your rear leg/foot out.
Foot positioning
If you have learned to heelside pendulum slide, the foot positioning should be the same.
If not, you can read this article for more info on this topic.
Weight distribution
I’d say the weight distribution might be something like 60-50% on your front leg and 30-40% on the back leg and whatever amount you’re comfortable putting on your hand, just don’t put TOO much weight on your hand.
Stay planted on your front leg
It’s important to stay planted on your front leg, with your weight on it. This is key to this slide.
If you can’t do this, it will be hard to hold the slide at a lower angle.
This may vary for people, but I’ve found the easier you find it to be planted on your front leg, the more success you’ll have with this slide.
And not being able to be planted could be because of a few things: bad griptape, too grippy wheels, poorly setup board, too much concave on your board, bad foot position, bad setup carve, poor flexibility, so make sure all those things are not a problem.
Location, location, location
You then want to find a location that has a corner you can practice this on.
This slide will be easiest to learn on a corner. With a corner, it is much easier to point your body at it and it’s easier to hold the slide at a lower angle.
You also hook up with your trajectory pointing into the direction of the corner and don’t have to re-adjust so you don’t hit anything, you can simply keep going through the corner.
On a straight road, it’s difficult to point your body at an imaginary point, and even more difficult to hook up out of the slide and quickly adjust your trajectory so you don’t go off the road to the side.
Find a corner, preferably on a hill so you can get enough speed to learn this.
How to actually heelside pre-drift
Two ways to do this
You can either:
- Push out with your back leg
- Rotate your lower body.
Either will allow you to predrift. You simply pick the one that works better for your body, riding style, and the board you are using.
Pushing your back leg out will be the easiest to learn, so we’re going with that.
However, when most people get more experienced, they tend to rotate with their hips/lower body as opposed to kicking out their back leg. It’s more accurate but requires more skill to pull it off.
Step 0: Practice hand drag carving
We’re going to warm up by practicing hand drag carving.
This will allow us to get comfortable in the slide position when on the board and when moving. This will give us a lot of confidence when it comes time to do the slide.
I recommend starting your session by warming up this every time.
Step 1: Setup carve
As always we start by initiating the setup carve.
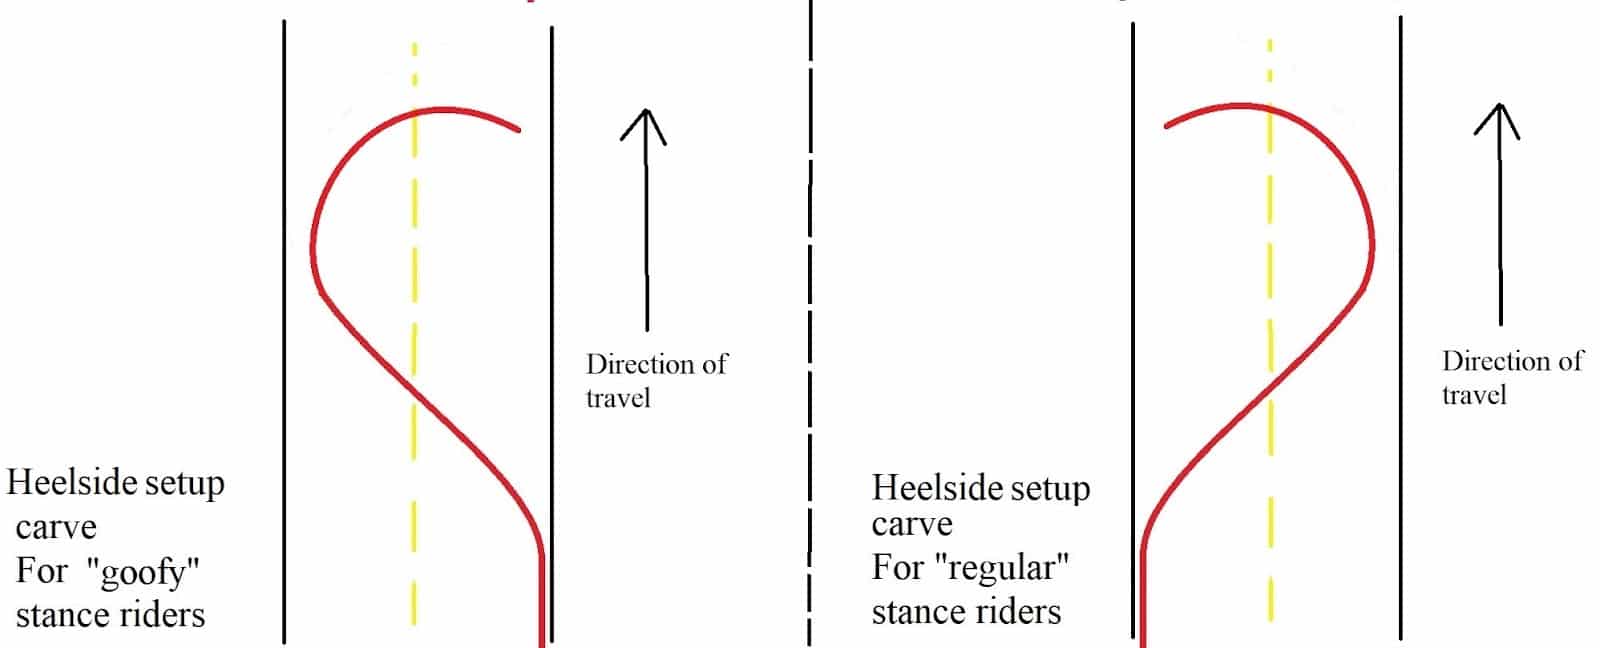
The setup carve is very important. It will help you bring the board to that edge of traction where it is easiest to kick it out into a slide.
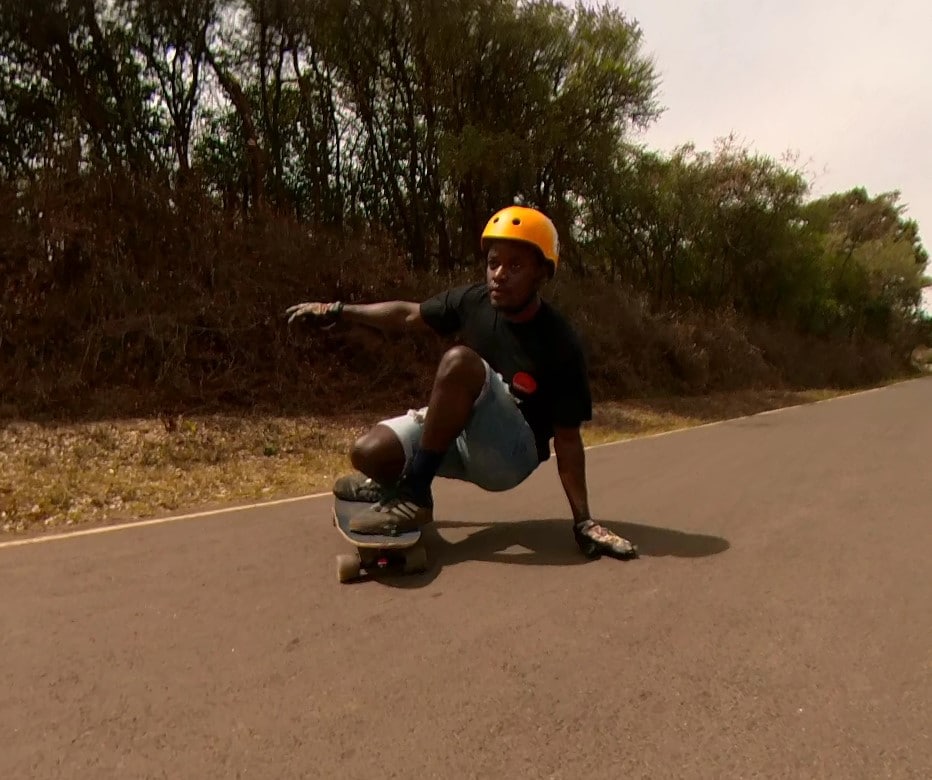
Step 2: Hand on the ground
Arguably the most important step. If you can nail this you will be able to pre drift comfortably.
At this point of the setup carve, you get into the box position, putting your hand on the ground and shifting your weight appropriately.
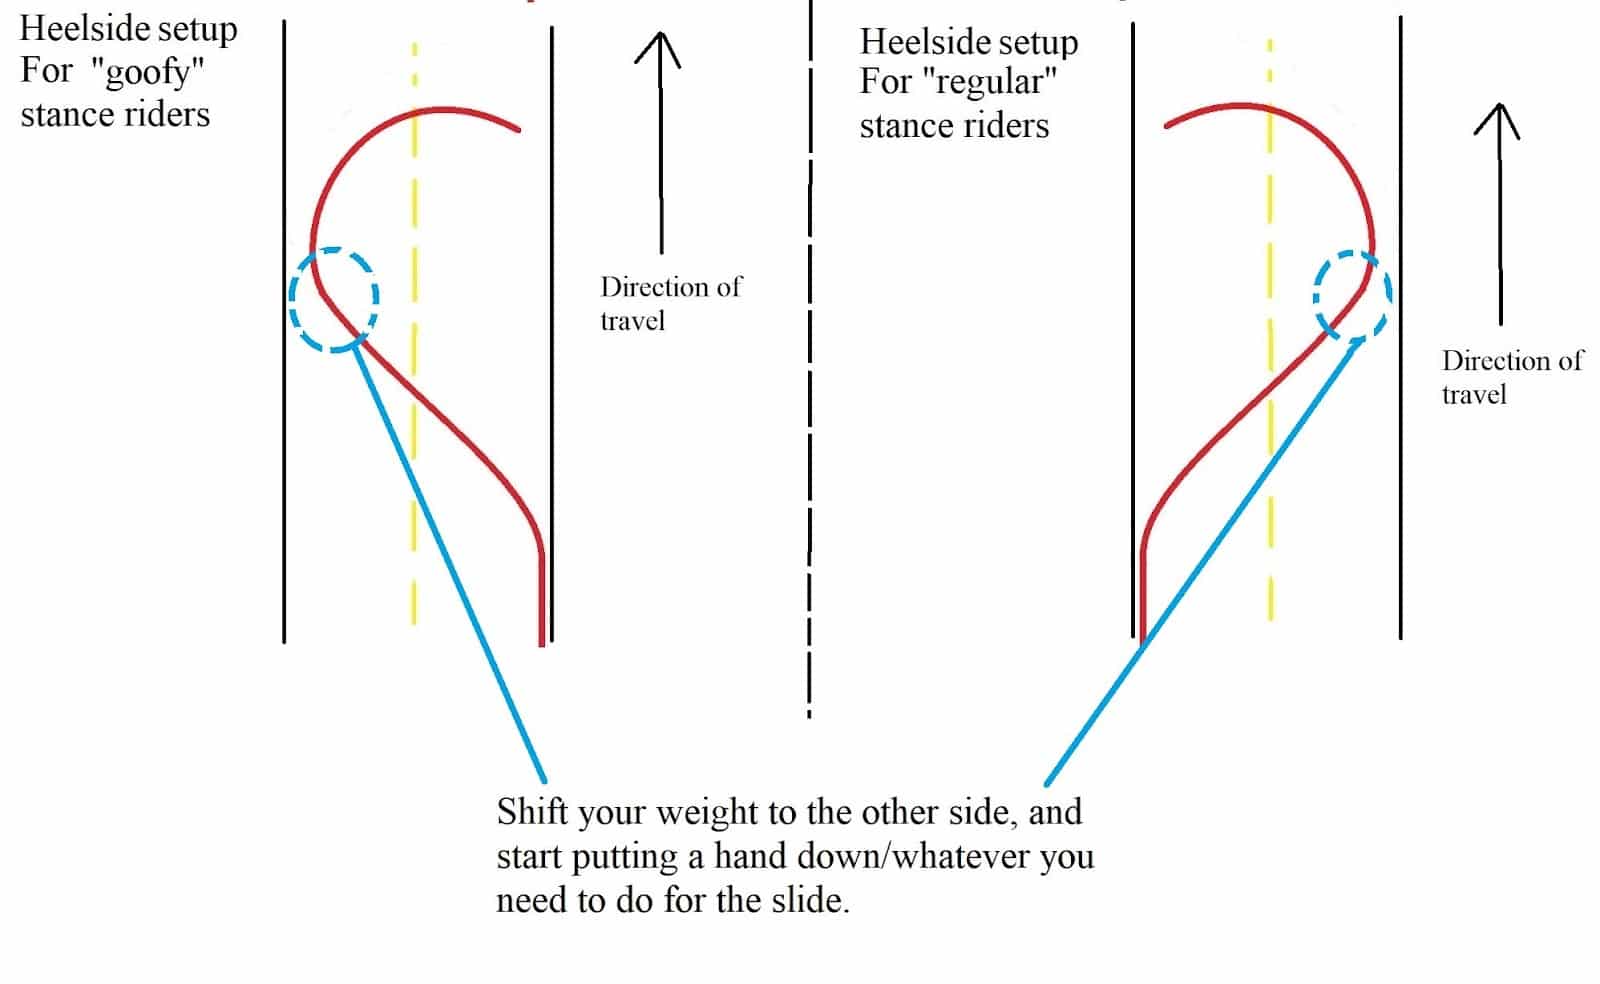
How composed and comfortable you are in this position will determine how easy it is to kick out the board and control it.
With the putting of your hand on the ground, you also lock in the position you want your upper body to face. You shouldn’t move your upper body much after this (but it can shift in reaction to your lower body).
This step is so important. In most cases, it can make or break the predrift.
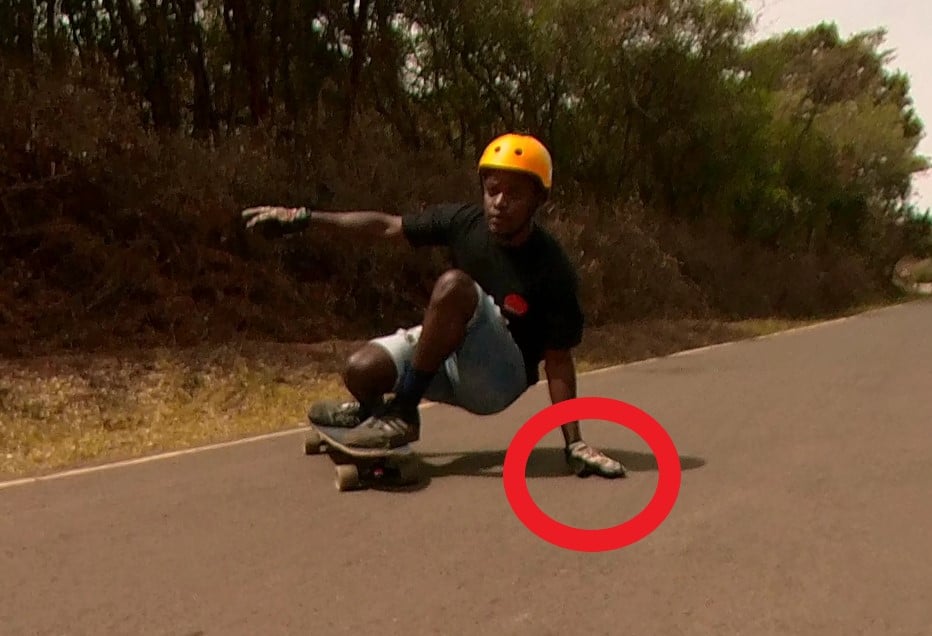
Step 3: Kickout
At this point of the setup carve, start kicking out your back leg.
The kick-out is pushing your back leg out, but you also push down.
It’s a forceful, but controlled push. You have a lot of pressure and power behind this leg, but you exert that power and force gently.
As you kick out your back leg, you should focus the pressure and weight on your front leg on your heels/the lower part of your foot.
Having weight/pressure on your front leg will help the front wheels break out and will be KEY to holding out and controlling the slide.
When maintaining pressure on your front foot, it’s almost like you are pushing it out as well. You aren’t, but that’s what it can feel like.
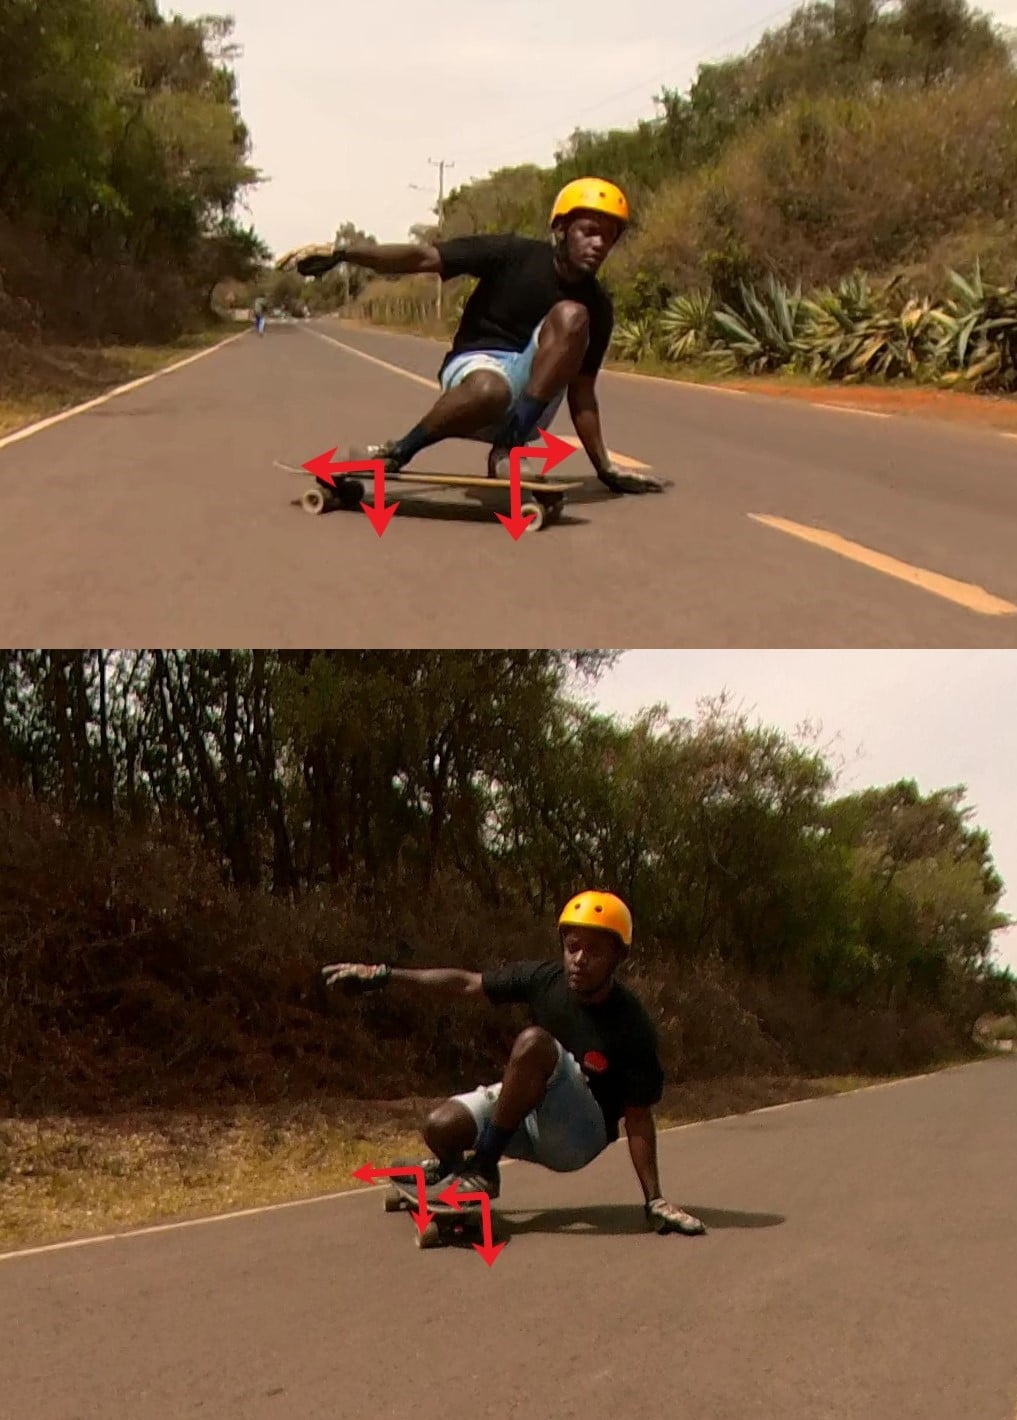
More on extending your back leg
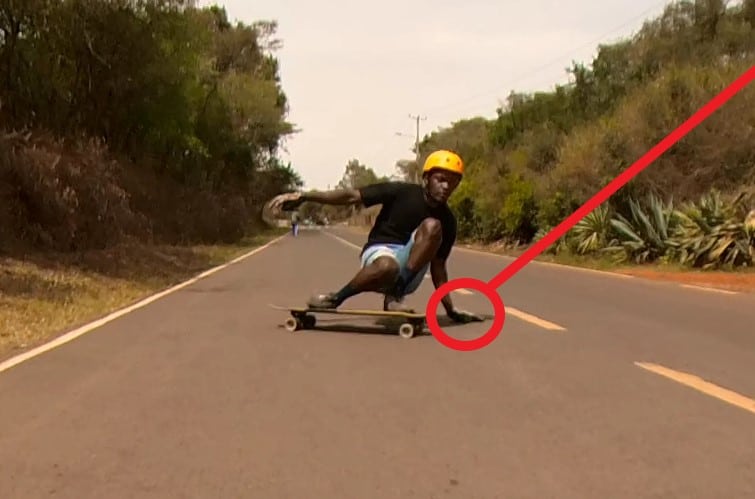
Now with the kick out, you’re essentially extending your back leg from that bent position.
You can extend it to a point that feels natural, but not to a point where your back foot is at the same level as your front foot.

You always want your back foot to be slightly behind (or quite a bit behind) your front foot as demonstrated by the image above. But yeah, whatever feels natural at this point.
If you extend your back leg to the point your back foot goes ahead of your front foot, you will end up sliding at 90*. This will mean you’re just sliding straight and not directionally. You will flat spot your wheels (as they won’t rotate during the slide) and end up not slowing down as much.
*By extending I mean straightening your back leg as if you want to straighten it out from being in that bent position.
Step 4: Hang in there
If you’ve done the above correctly, hang in there as you drift towards the apex of the corner and shave the desired amount of speed.
And once you’ve shaved off as much speed as you want, it’s time to hook the board back up.
Step: 5 Hookup
There are two ways to hookup:
- Release pressure off your back foot, and the wheels naturally bring your board back into going straight.
- Release pressure and pull your back leg in.
The first works quite well with grippy wheels, the second works best with much slidier wheels.
Grippy wheels don’t want to slide, so they kinda want to pull the board into going straight again.
Slidier wheels don’t “mind” sliding, so they don’t pull you back. You hook up really weirdly sometimes if you try technique 1 on slidey wheels.
I’m going to be talking about technique 2 primarily as you’ll likely be learning on slidey wheels.
How to hook back up
So yeah, as you pushed your back leg out, you simply pull your back leg in. But you do so in a deliberate and controlled way.
As you do this, you also maintain weight and pressure on your front foot (remember on your heels/lower part of your foot). You can also push out with your front foot to help the board rotate – but this may not be so successful for a beginner, but it is an option that is available.
Both of these things should allow the board to start to rotate in the opposite direction and stop sliding.
Once you feel the board stop sliding, you can lift your hand off the ground.
Some tips
Trial and error
You gotta practice this ish. It took me a LONG time to get it down. Don’t get discouraged if you don’t get it in the first day or 4th week.
Flexibility is important
As Liam T points out: “hip and knee pain is common, people need to stretch”. Flexibility plays a key role in doing heelside slides. If you can’t squat comfortably, you might have issues with it.
Things that will make your heelside difficult
- Too grippy wheels,
- Shitty griptape (not sticky enough, worn down),
- Poorly setup board
- Poor weighting
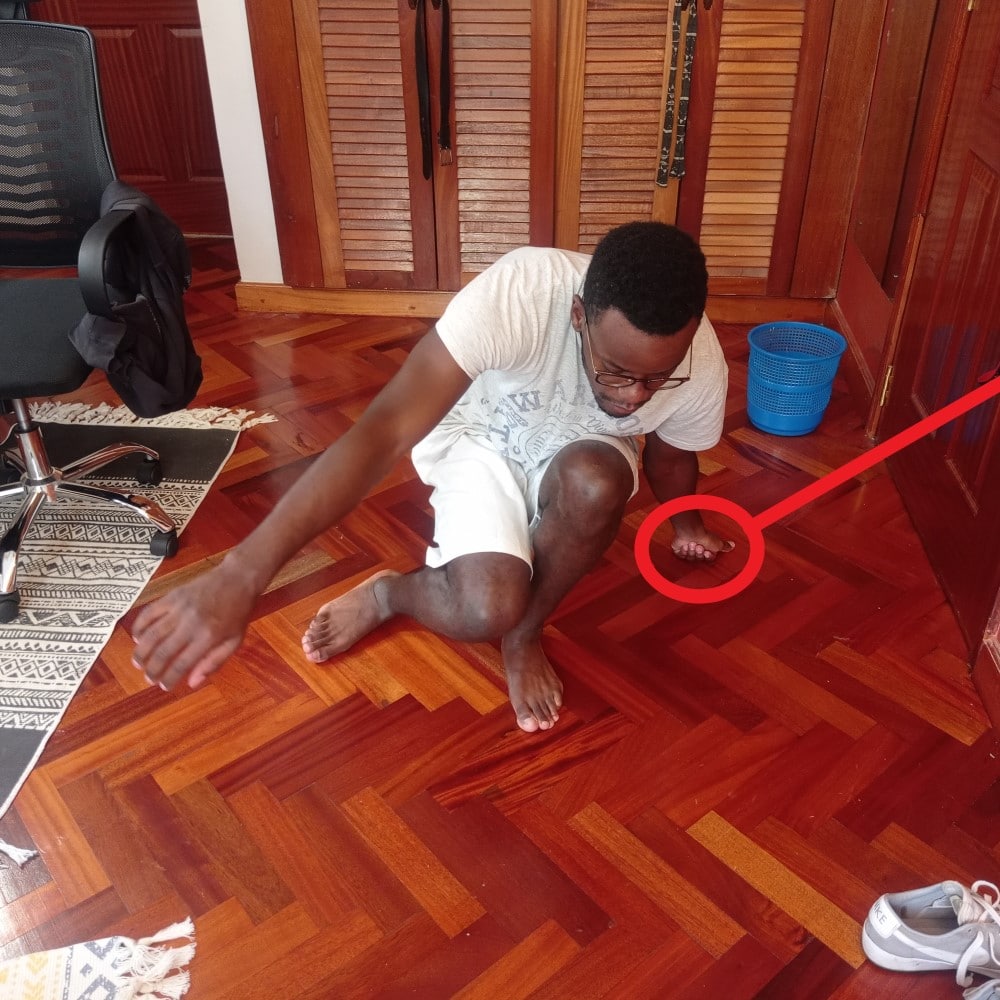
Feet fully on the board
If your feet don’t have full contact with the board, it can make sliding and controlling the board the way you want a bit more difficult. Try to have your front foot as flat as possible and the length of your back foot in full contact with the board. That said, some lift on your feet is ok, and a little of it won’t kill you.
This guide is part of the downhill skill progression guide. Check out the guide if you want to learn about which skills you need to learn for downhill skateboarding.
And that’s it! Has this guide been helpful?
And that’s it for the tutorial, let me know if it has been helpful and if you have any questions. Thanks for reading.
Big thanks to all my patrons for the support – David, Squirrels Adventures, Mike, Jed, Mowgii, Jan, Josh, Jay, Jay, Bryan, @owencampbell777, @dkwan, Alex, Kasajja, Domnik, Reuben, @pablo.vega.andrade, Vlad, Asa, Helge, DeLacoste, Peder, Josh, Mike, Anthony, @issishreds, Greg, Jackson, Slipa, Louisa, Bill, Steve, John, Austin, @bomber_p_, Brian, Jeffrey, Jules, Henry, Austin, Philip, and Justin. I couldn’t write articles like this without you guys’ support.