So you’ve picked up your first longboard and you’re looking to get to grips with the basics of downhill skating? Fortunately, over the next couple of weeks I’ll be focusing on topics that will help you develop the skills to do so. A “Skills to bomb hills” series. First up, today’s article will be a short guide to the basics of tucking. Check it out below.
This is the first in a series of articles and videos geared towards beginners. I’ll be discussing tips, gear, techniques, and other small things beginners have issues with:
- Skateboarding basics: How to balance on your skateboard and push
- The guide to safe downhill skating
- How to setup your trucks for downhill
- Best wheels for learning to slide
- How to pick your first skateboard for downhill skating
How to tuck: Downhill skating basics
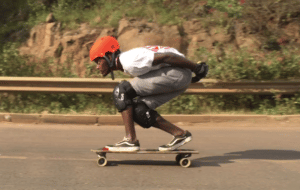
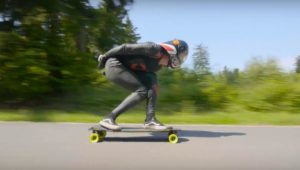
The simplest explanation of tucking is as follows:
- You stand with your legs about shoulder-width apart.
- You rest your back knee against the calf of your front foot.
- Bring your chest down as close to your front thigh as possible.
- Hold the position as long as you can.
- The picture below for reference.
I would suggest trying the above, taking some photos and notes, then troubleshooting whatever little problems you have with the guide below.
As we get into this, please also understand that tucking is a really personalized thing. It’s up to you to find what works and what is comfortable. As much as my guide will be useful, it does have its limitations. Finally, don’t simply copy what you see the pro riders doing – you might end up hurting yourself and straining your body to match what theirs is doing. Remember, we are all built differently and should work out what works best for us. Of course, you can always improve your tucking later on through stretches and exercise.
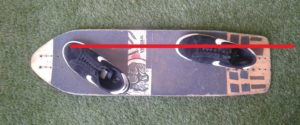
How should you position your feet?
You should aim to position your toes in line with each other. This should allow you to balance well on your skateboard. It is the most comfortable position to balance and you’ll find your thighs working less to keep your center and balanced.
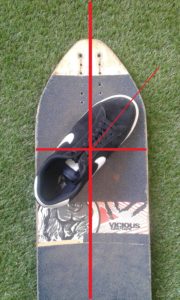
At what angle should your front foot lie?
You will see many riders doing this differently. Typically, find a position that is comfortable with you.
Start with your foot at a 45* angle like the picture below. If it is comfortable, you can leave it like that. However, if it feels awkward, you can lessen that angle and straighten the front foot. As you do so, it is a good idea to pivot along the imaginary center line of the board, with the center of your foot as the pivot axis/point of rotation. This should allow you to have just as much of your heel and toes sticking out, still giving you decent balance.
So try to find an angle you are comfortable with.
Where should my back foot be on the board?
You should try to have it in line with your front toe in order to get the best balancing possible. That said, it could be closer to the edge of the board if you find that more comfortable. However, keep in mind that having your toes inline with each other provides the best balance. You might find in time that it is best to have your back foot there.
Where to place your back knee?
Some riders place their back knee high up on their calf, others place it a lot further down. I typically suggest you place it where comfortable as you are learning how to tuck. Check out the “What different tucks look like” section below for images of how different riders place their knee.
Tip: The further you place it down, the easier it is to bring your chest down to your thigh. You should balance this between where your knee is comfortable and how close you can bring your chest.
Data shows that the most aerodynamic position is having your knee as far up on your calf as you can possibly get it. However, if this means sacrificing how close you can get your chest to your thigh, or how comfortable you are, then it isn’t worth it imo. The most aerodynamic position for an individual is how comfortable they are on deck. If you’re struggling and shifting about, you disrupt the airflow around you and this slows you down even more.
How to distribute your weight in the tuck?
Weight distribution is a key thing to get right if you want to be stable in the tuck.
*shoutout to Reddit user Serc- for asking me to add this. Also, did some research on the interwebz, check out this FB group thread if you want to see what riders had to say for themselves.
A lot of riders had their weight distribution to be around 80 – 20, with 80% of their weight focused on their front foot and 20% on the back foot. For a beginner, I would advise them to aim for 70 – 30, or a 60 – 40 distribution. It will be a bit more forgiving and easier to learn with it that way. As you get better and skate faster, you can shift more weight forward.
Finally, you should also note that weight distribution varies depending on what you’re doing on your board. Riders would shift more weight to the back when skating rougher roads, sliding, or “tuck leaning” around corners. So keep this in mind and don’t limit yourself to an “80 – 20” distribution for all things.
Troubleshooting your tuck
I want to improve my tuck, what should I do?
Stretching and exercise is the way to go. If you want to improve your form, you stretch. If you want to tuck longer, you exercise.
Target stretches that loosen up your hips and lower body. I’ve found that stretches that loosen up the thighs make it easier to tuck.
Exercise wise, box squats, wall squats, and pistol squats all work the muscles that you use when squatting. You can also simply hold the tuck position as long as you can. Eg. 3 minutes on, 1 min off – eventually building it up longer and longer. Mixing and matching these exercises will probably give you the best results.
I can’t get my chest down to my thigh
If this is an issue, you can simply place your back knee further down on your front calf muscle. It’s a quick and easy solution.
A better long term solution is stretching. This stretch at 3.12, in particular, is quite good for tucking.
I don’t feel stable, what am I doing wrong?
As I highlighted earlier, your back foot may not be in line with your front one. Tucking with them inline with each other usually gives immediate improvements. However, some other problems might be:
- Perhaps your back foot is too far back, too close your back truck. This puts too much weight on your back truck which leads to instability. Bring your foot closer to the front generally helps. That said, it might also throw off your form. So if you like your back leg where it is, you might want to tighten up the back truck, get harder bushings for it, dewedge it, get a lower angle baseplate etc. Basically anything to increase its stability.
- You’re not putting enough weight on your front foot. If you have too much weight on the back foot you’ll be providing too much ‘input’ to the back truck causing it to lean and turn when you don’t want it to. I recommend leaning into your front foot, increasing the pressure on it as much as you’re comfortable doing so.
- Your gear isn’t that good. Trucks and old bushings are key suspects, but also, an inappropriately set up skateboard could also be the culprit. I recommend checking out my gear knowledge archives to educate yourself, or hitting up the #WhatgearIshouldbuy Facebook group for advice from Pros.
I feel really uncomfortable.
Earlier I said to stand shoulder-width apart. Usually, this leads to a comfortable tuck for a lot of riders. That said, some might prefer their feet further apart or closer. I think you should experiment with either and find what is most comfortable and stable for you.
Finally, keep experimenting. Shift your knee up and down. Move your legs this way and that way. Do everything until you find what is natural. Then improve it from there.
What different tucks look like:
This section should serve to show you how different tucks are between riders. Every rider works hard to have a tuck that works well for their shape, body type, flexibility, etc. Don’t get lost trying to copy what another rider does. Find what works for you, what is comfortable, and bring it all together.
Carlos Guto Negao Paixao:
One of the fastest riders in a straight line, Carlos has a great tuck. He manages to compress his tall, dense body into a compact shape. For his build, Carlos has a surprisingly flexible body.
Dane Hanna
One of the best riders on the IDF race scene right now. This guy might just win the 2020 season. Dane (on the right in the picture below) has a pretty good tuck, beating a lot of racers in a straight line.
Nick Broms & Chase Hiller
Two of the best riders on the race scene right now. Nick (right) has a compact tuck. He bends his back a ton, so that he can close the gap between his thighs and chest – not something a lot of riders can do comfortably. To his advantage, Nick has a long/strong enough neck that allows him to raise his head enough that he can still see out of it.
Tim Del & Max Capps
With a tuck now know as the “Tim Del tuck”. Tim (left) has one of the more unique tucks in the scene. Personally, I look at this and think “There is no way that that tuck can be aerodynamic”. But the results speak for themselves. Tim is one of the fastest riders in a straight line and even came in second at the L’Ultime Descent event in 2017 with a speed of 146.53kph.
Max (right) came in fourth at L’Ultime Descent with a speed of 145.94kph.
Thiago Lessa
With arguably one of the best tucks in the scene, there’s no doubt that its what helped him become world champion in the 2018 IDF race season. With his technical skill and experience, Thiago managed to come out undefeated during that race season – winning every single one of his races. Unbelievable if you ask me.
Thiago compresses his tall frame into a compact shape that minimizes air resistance, with few gaps in his tuck. Thiago has a really flexible body which allows him to comfortably do this.
*Photo is a screengrab from Thiago’s Kozakov raw run. Watch it here.
Emily Pross
One of the fastest riders in a straight line, Emily is a force to reckon with on the world circuit. You’ll notice her tuck doesn’t exactly mirror the others on this list. Emily has found what is comfortable for her and is making it work. You should follow in her example.
Pearse D’Arcy
Pearse has a great tuck. With his back knee low down on his calf, he manages to completely close the chest-thigh gap. Also, the large chin on his aerolid (a special type of longboarding helmet) allows no air to through that way.
Have you found this article useful?
Getting good at downhill skating will be an uncomfortable, awkward, and often painful experience. But trust me, the reward at the end of the tunnel is worth it.
If you like this article and want to read more, let me know on social media! Getting feedback from people is how I know these articles are helping people. Alternatively, you can also support me through Patreon. Whichever works for you 🙂
Thanks to Patrons Jed, Mowgii, and SuperBadJuJu for the support so far.
Check out other relevant posts here:
- Skateboarding basics: How to balance on your skateboard and push
- The guide to safe downhill skating
- How to setup your trucks for downhill
- Best wheels for learning to slide
- How to pick your first skateboard for downhill skating
2 comments on “Downhill skating beginners guide: How to tuck on your longboard”
Robert Hogward
April 20, 2021 at 2:08 pmThe longboard promises a great and amazing ride and cruise on the roads or downhill. Its trucks are designed to achieve smooth carving and great turns.
A longboard has different types, designs, and colors. On the first look, the longboard is appealing and attractive. 🙂
[…] this: http://downhill254.com/skating-beginners-tuck-longboard/ “unclog the hose” -Ido Portal, big help for […]